- Duo Security
- LIUmobileID
- Encrypted Email
- LIU SSO
- Self-Service Password Reset
- Cyber Security Information
- Campus/Dormitory Networks
- VPN
- MyLIU
- LMS – BRIGHTSPACE
- Self-Service Password Reset
- Zoom
- Respondus
- Examsoft
- Echo360
- Microsoft
- Microsoft Teams
- Adobe
- Telephone Services
- Quality-Matters
- Faculty Evaluation
- CloudShare
- Sharepoint/LIUshare
- CampusLabs
- Other Software & Services
- ITRC
- Labs & Classrooms
- Workshop Calendar
- Browse
- About Us
- HOME
- SECURITY
- Duo Security
- LIUmobileID
- Encrypted Email
- LIU SSO
- Self-Service Password Reset
- Cyber Security Information
- Campus/Dormitory Networks
- VPN
- MyLIU
- LMS – BRIGHTSPACE
- Self-Service Password Reset
- Zoom
- Respondus
- Examsoft
- Echo360
- Microsoft
- Microsoft Teams
- Adobe
- Telephone Services
- Quality-Matters
- Faculty Evaluation
- CloudShare
- Sharepoint/LIUshare
- CampusLabs
- Other Software & Services
- ITRC
- Labs & Classrooms
- Workshop Calendar
- Browse
- About Us
- Introduction
- For Faculty
- For Students
- MyLIU Admissions FAQ’s
- MyLIU Financial FAQ’s
- MyLIU Academics FAQ’s
- MyLIU Videos
- Transact User Guide
- Grubhub at LIU
Introduction
The MyLIU portal provides students with convenient access to information about their records. By logging onto the portal, students may view their schedule of classes, register for courses, obtain their grades, request transcripts, and apply for graduation. They may also view financial aid awards, billing information, make online payments, accept and decline federal loans and Federal College Work Study, and make an appointment to see counselors. For more information, please visit or contact the helpdesk at Browse, LIU Brooklyn’s technology store.
To Access the MyLIU portal you must login using single sign-on.
Students: firstname.lastname@my.liu.edu
Faculty/Staff: firstname.lastname@liu.eduMY LIU Navigation Overview
Home Page
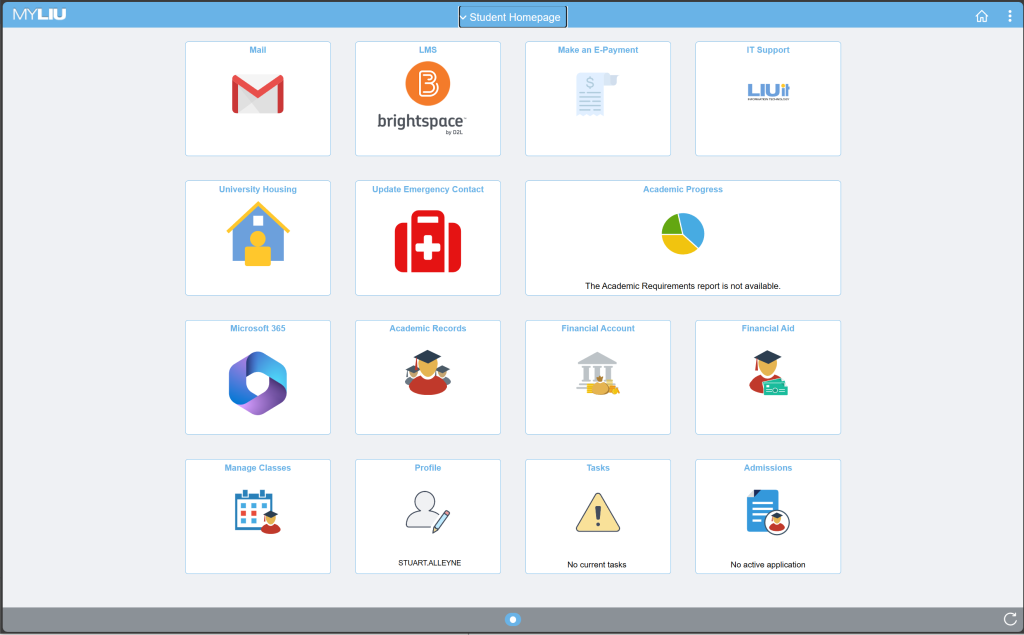
The Gmail tile provide a link to your student email.
Brightspace
The Brightspace tile provides a link to Brightspace, the University’s online learning management system.
The E payment tile provides a link to Touchnet Payment Systems which will allow you to make electronic payments to your student account.
The LIU IT tile provides a link to the Information Technology website.
The Housing tile provides a link to Mercury, the University’s Residential Management System. Use this tile to apply for on-campus housing.
Emergency Contact
This tile allows you to update your contact information
Academic Progress
The Academic Progress tile allows you to view your academic progress within the University, including your advisor’s contact information, course requirements & transfer credit reports. You will also use this tile to apply for graduation and verify your graduation status.
Microsoft Office
Click this tile to access and install the office 365 suite of applications
Academic Records
The Academic Records tile allows you to view your course history, view grades, and perform other related actions, including viewing unofficial transcripts and enrollment verification forms. From the Useful links menu, you can order a transcript and connect to your Blackboard Learn account.
Financial Account
The Financial Account tile contains your student account information including your account balance, payment history and enrolling in direct deposit. You may view your account activity by clicking on the “Account Inquiry” link under The Account Services Menu. The Student Financials Links menu includes access to make an online payment, enroll in Student Health Insurance or contact TAP/HESC.
Financial Aid
The Financial Aid tile contains your financial aid information. You will be able to see the financial aid awarded and will have the ability to accept or decline your financial aid.
Manage Classes
The Manage Classes tile allows you to view your Class Schedule in a number of formats, register on-line for classes, and add/drop courses. You may also browse the Course Catalog from this tile.
The Profile tile allows you to view key personal data maintained by the University; it allows you to confirm that your address, name, phone number and email information is correct.
The Tasks tile displays your To Do list and information regarding Holds.
The To Do List menu displays remaining documents and actions required to complete tasks for Admissions, Financial Aid, and other departments within the University. When you click on a task, you will be able to see more information about items on the To Do List and which office to contact to complete them.
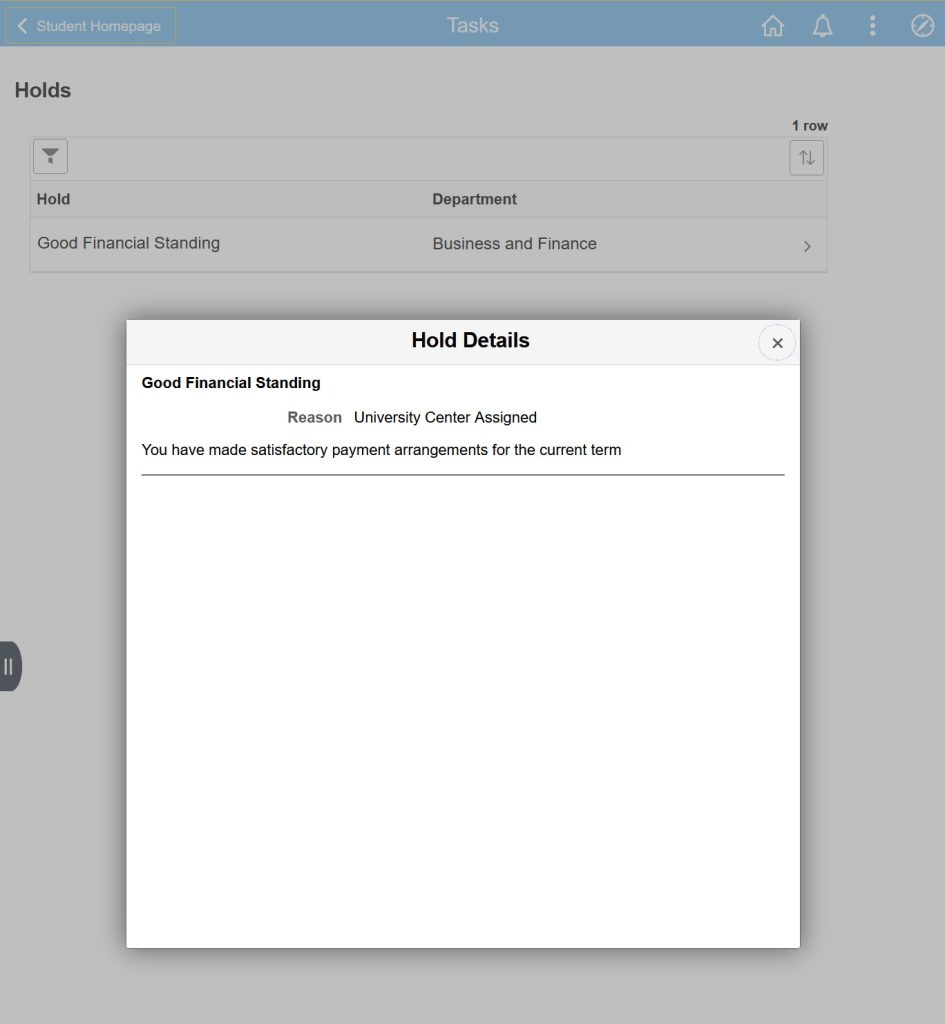
The Holds menu allows you to view hold information placed on your account that will prevent you from accessing or engaging in select University activities. When you click on the Hold you will be able to see which office placed the Service Indicator or Hold on your record and you can contact them for information on how to remove this Hold.
Admissions
This tile allows you to check on your application status as see a list of To Do items for the application.
Academic Progress
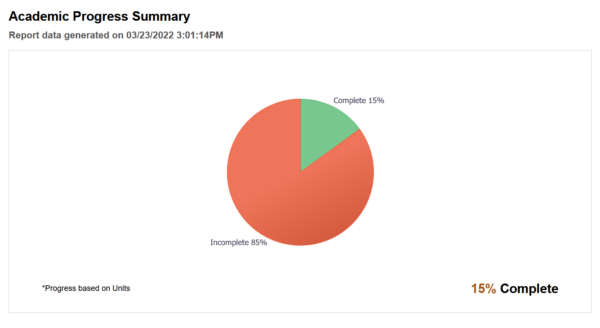
Summary – This page provides an overall view of your academic progress towards your degree at LIU. The percentage of your program requirements completed show in green and the incomplete portions are in red.
Academic Progress – This page provides a detailed view of your academic progress towards your degree. The degree audit will show your degree requirements and indicate if each category or requirements have been fulfilled.
The audit will read “Not Satisfied” until the requirement is satisfied in its entirety. The audit will give the number of units needed to satisfy the requirement.
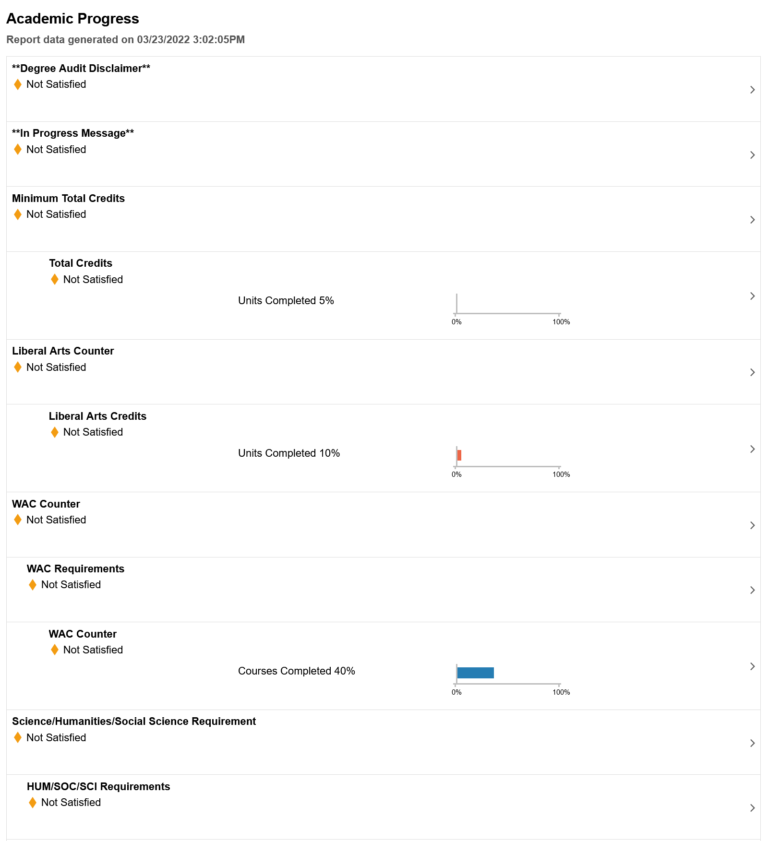
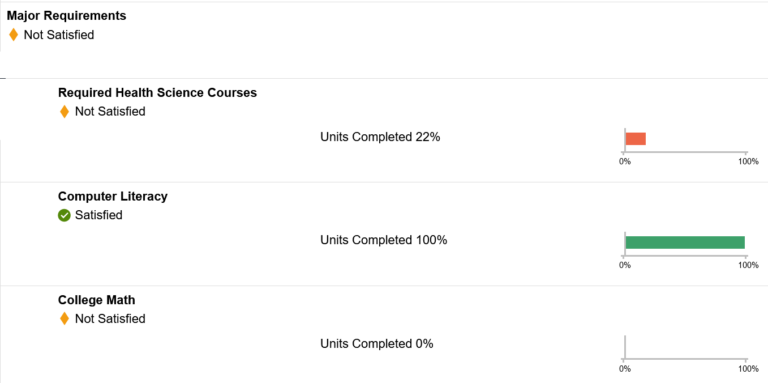
If a particular number of units (credits) and/or courses is required to fulfill a requirement, you will be able to display the total number required, the actual number (completed and in-progress) you have towards that requirement, and the remaining number needed.
Click on a requirement category to display the details of that category.
Degree requirements will be “nested” on your degree audit.
For example, if your major requires a number of elective courses in your major department, the audit might show Major Required Courses and Major Elective Courses separately, but they will be nested within your Major Plan.
The Major Plan would still read “Not Satisfied” until all requirements nested within it are satisfied.

Course Requirements Alerts – Term
Expected Graduation Term – This page will display your projected graduation term based on your academic progress and admit term.

Advisors – This page will display the name, photo and contact information of your advisor.
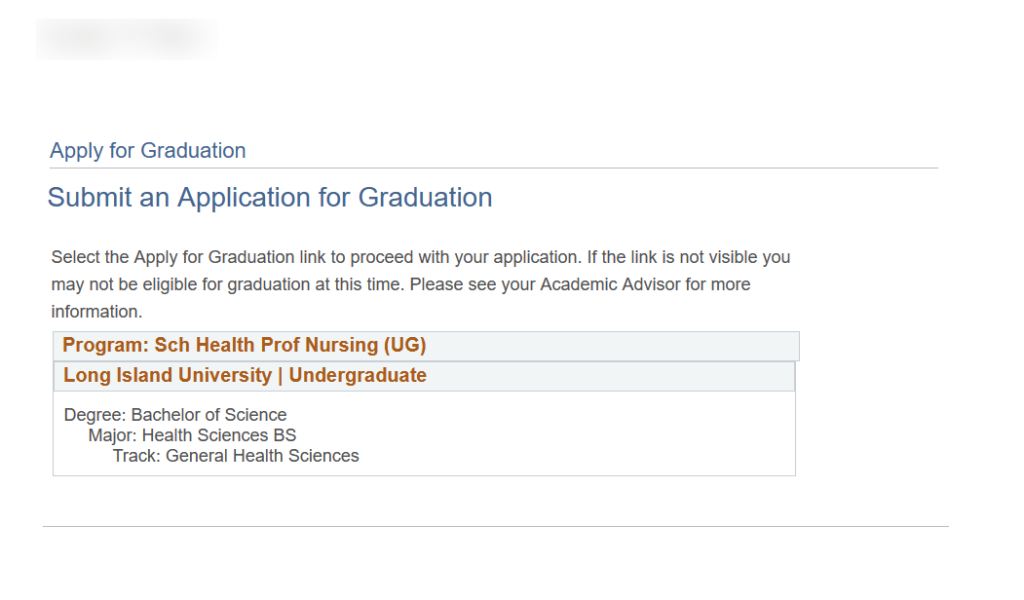
Apply for graduation

View Graduation Status
View Transfer Credit Report – This page allows you to view the number of credits you have received based on courses from other universities and Advanced Placement test scores.
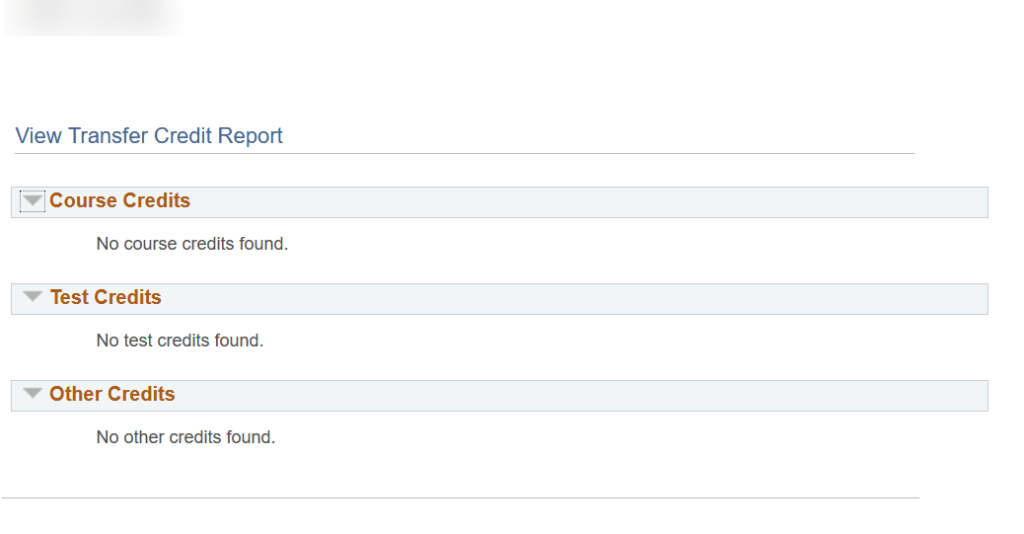
Academic Records
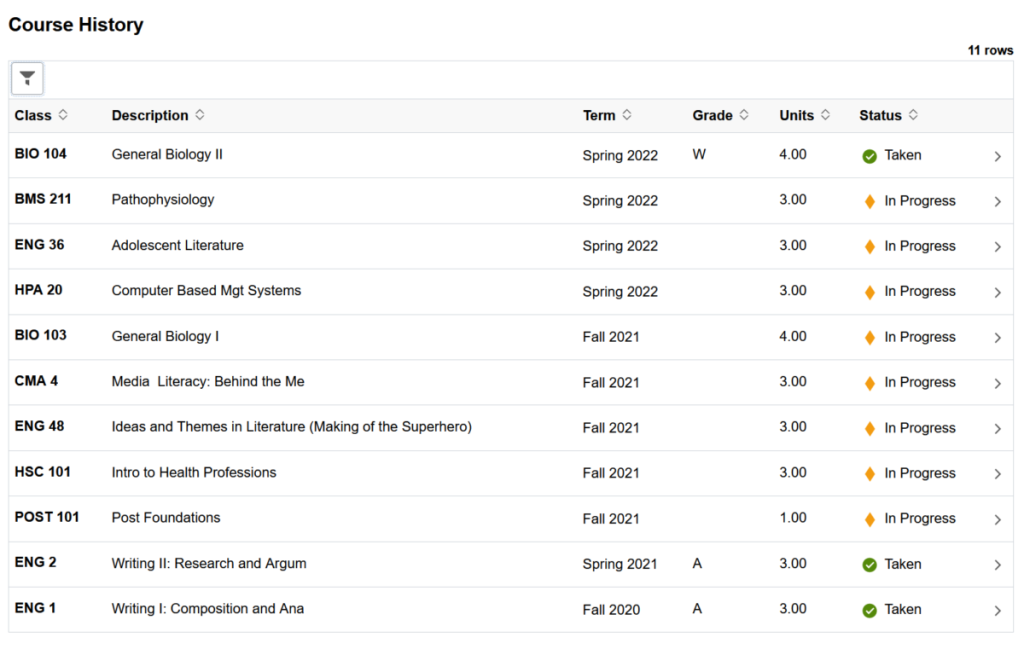
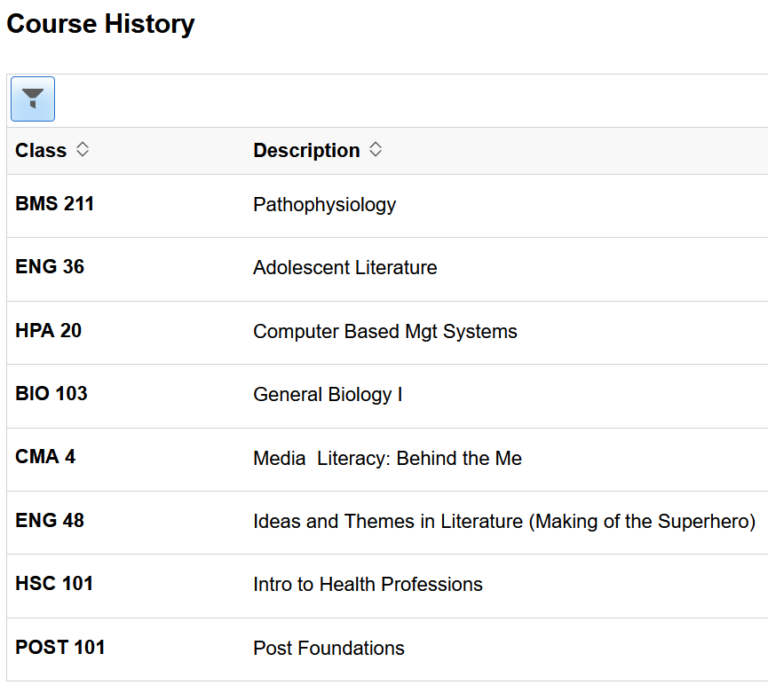
Course History allows you to view all of the courses that you have taken at LIU. You can sort the list by clicking on any of the column headings. Clicking on a specific class will display additional information such as meeting times and the faculty assigned to the course.
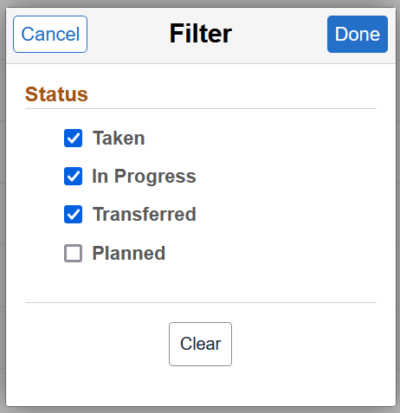
You can also filter the class based on the status – Taken, In Progress, Transferred or Planned – by clicking on the filter button above the class numbers. Select the status by clicking the appropriate box and then clicking done.

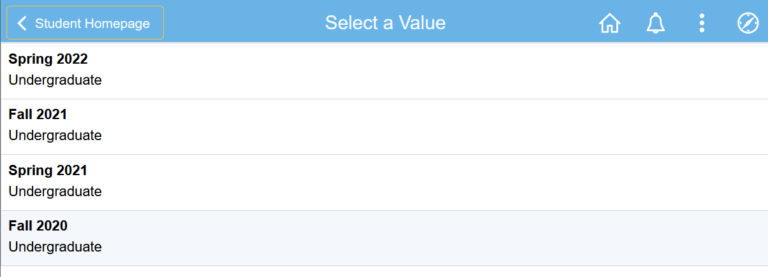
View Grades allows you to view a list of your grades for a given term.
Select the term you wish to view.
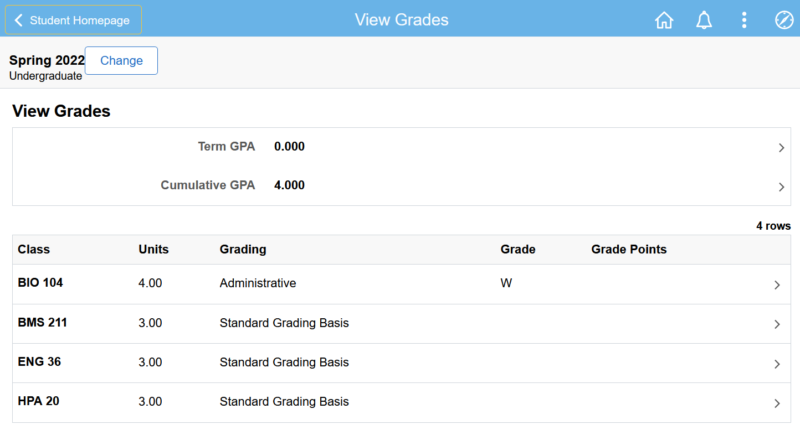
The courses you were enrolled in and their corresponding grades will be displayed. Clicking on a specific class will display additional information such as meeting times and the faculty assigned to the course.
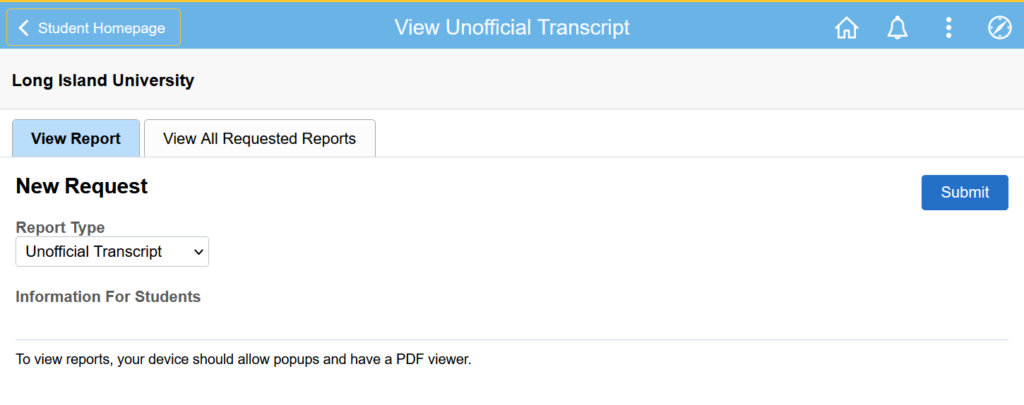
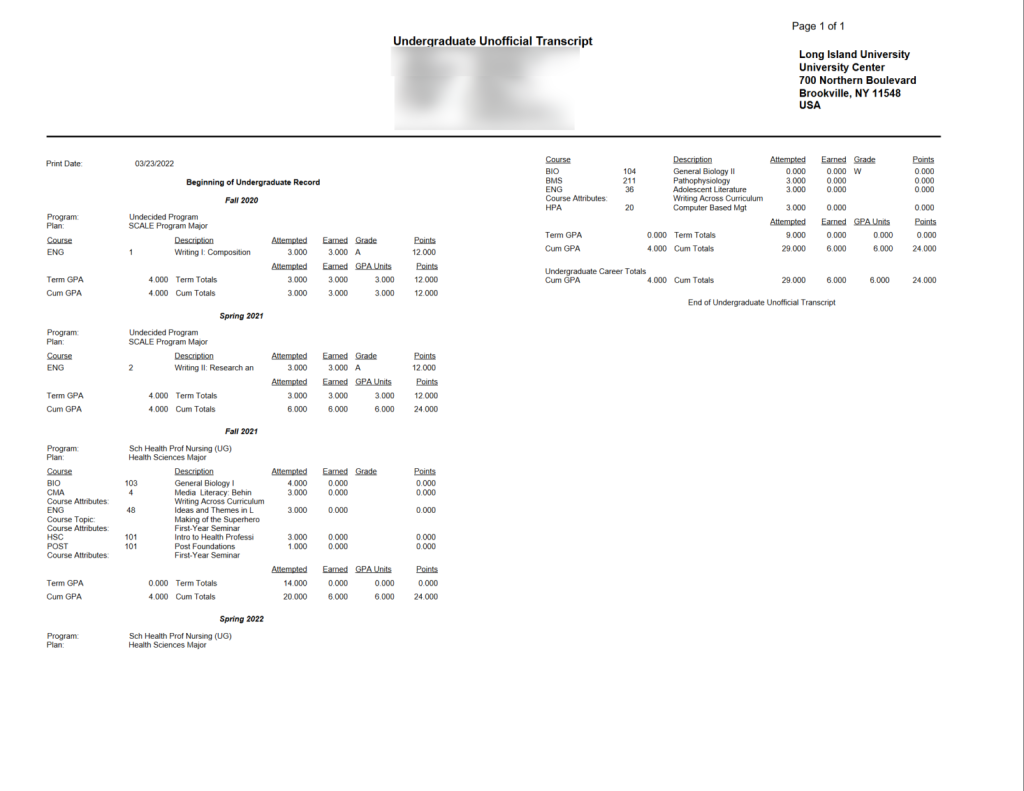
View Unofficial Transcript allows you to generate a copy of your LIU transcript. Click the Submit button in the upper right corner to create the transcript. This will create an up-to-date transcript with your current data. Your transcript will be displayed in PDF format once processing is complete.
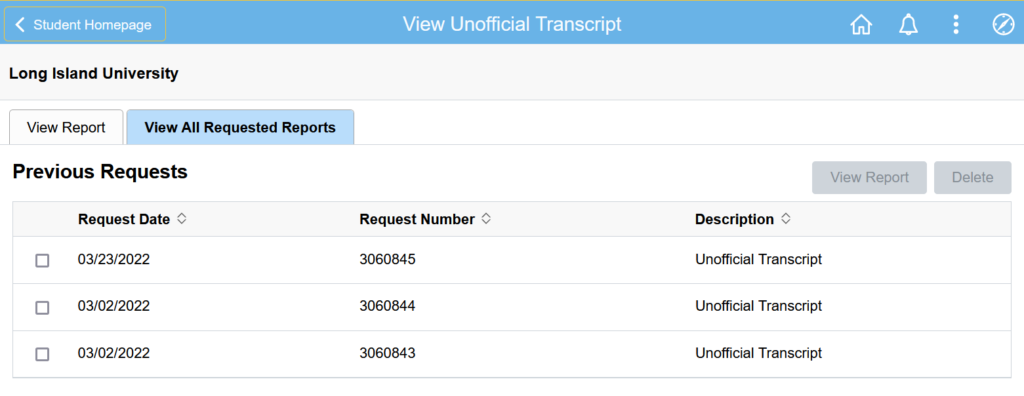
Clicking the View All Requested Reports will allow you to view any previously created transcripts. You have the option to view the report or delete it.
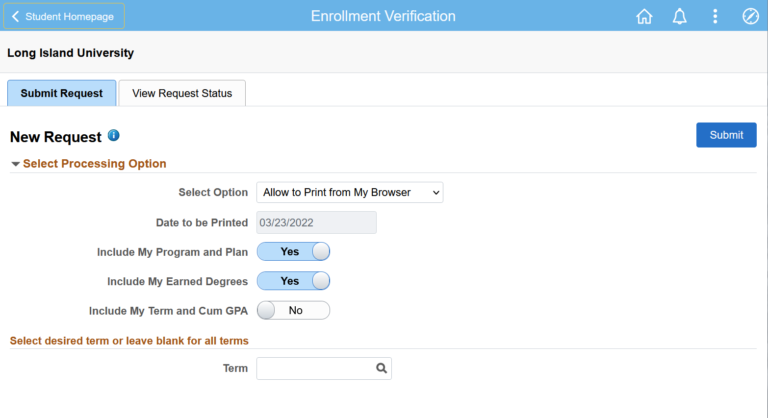
Enrollment Verification allows you to generate a document indicating your enrollment status at LIU.
There are several processing options available:
- Select Option – allows you to print the document from your web browser or to request LIU to mail the verification form. The default value is “Allow to Print from My Browser”.
- Include My Program and Plan – select Yes to have your program and plan print on the report. Selecting No will hide this information. The default value is “Yes”.
- Include My Earned Degrees – select Yes to have your degrees included on the report. Select no if you do not wish for your degrees to be displayed. The default value is “Yes”.
- Include My Term and Cum GPA – allows you to include your GPA information on the report. Select Yes to include the data. The default value is “No”.
- Term selection allows you to include all of your terms of attendance or to specify a term. The default is to leave the field blank which will include all terms.
After confirming the processing options, click the Submit button in the upper right corner.
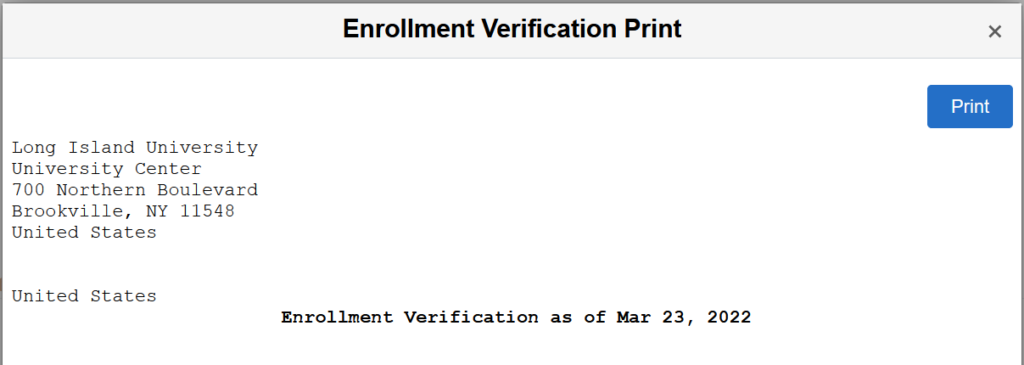
If you select the “Print from My Browser” option, the Enrollment Verification will be displayed. The form can be printed by clicking on the Print button.
If you select the “Request Institution to Mail” option, you will be prompted to enter additional data including the number of copies & where you would like to have the form sent. You can request to send it to yourself or to an external agency.
If you set “Send to My Address” equal to Yes, you will be prompted to select the address to which the form should be mailed.
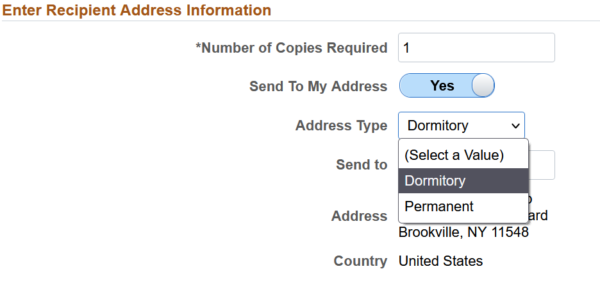
If you select No for “Send to My Address”, you will be prompted to enter the address where the form should be sent.

Useful Links
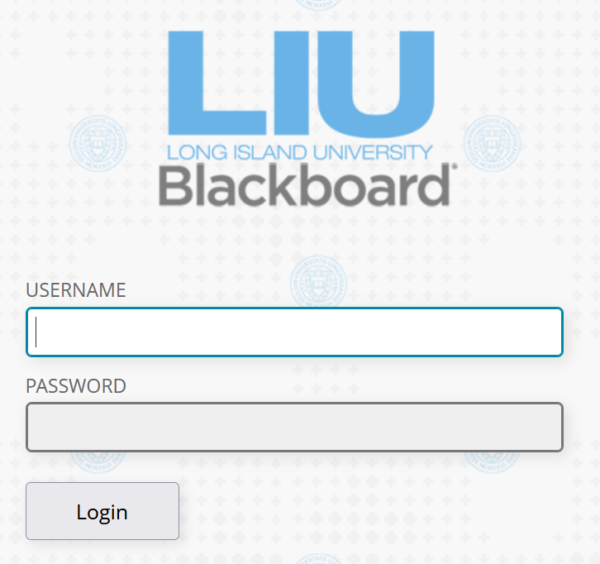
Blackboard – clicking on this link will open a new window where you can login to LIU’s Blackboard Learning Management System.
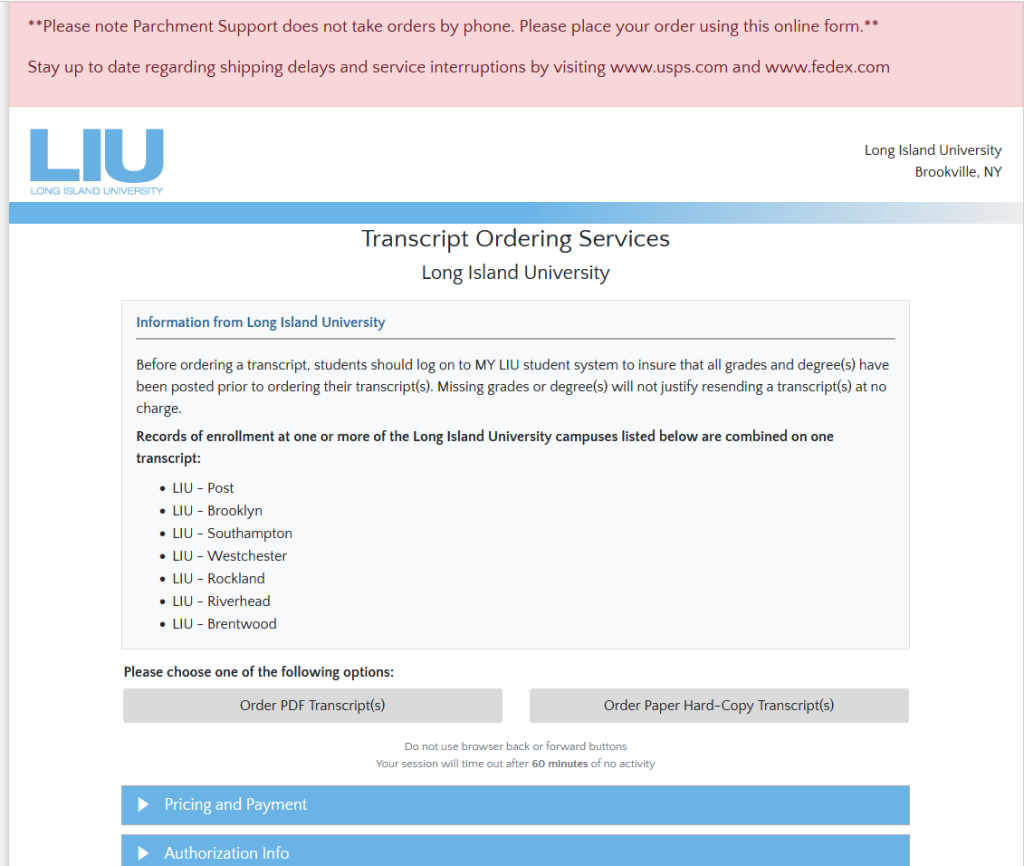
Order a transcript – clicking on this link will open a new window where you can submit a request for official transcripts.
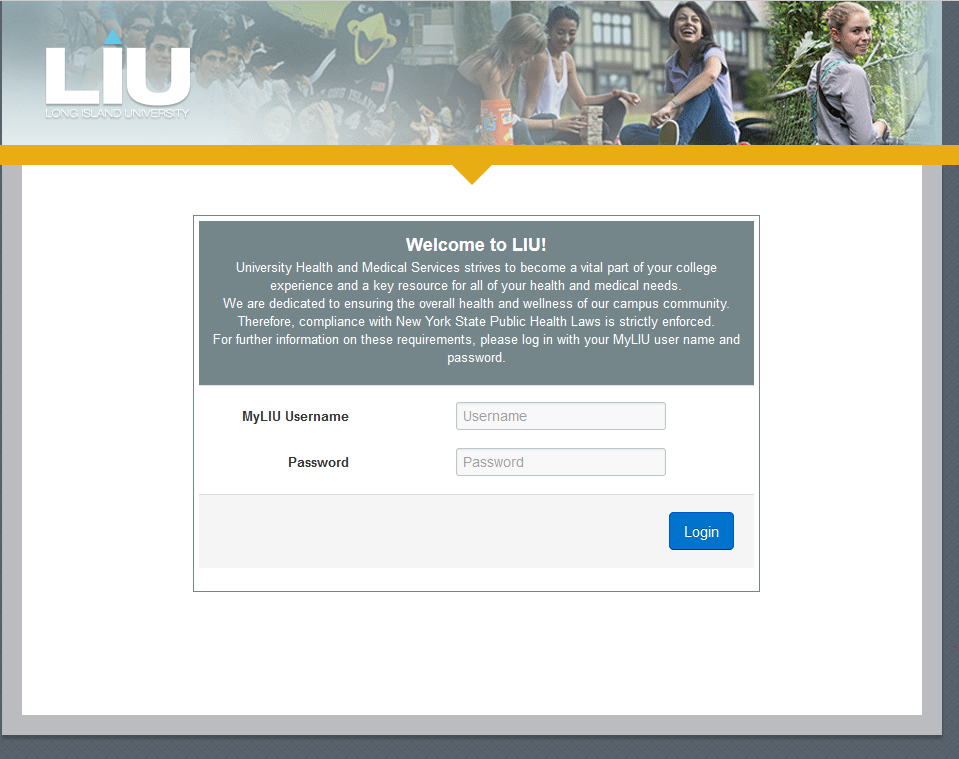
Meningitis Response Form – clicking this link will open a new window that will allow you to login to LIU’s Vaccination and Immunization portal.
Financial Account
Account Balance – allows you to view the current balance on your student account. Totals are listed by term along with an overall account balance total.
- Total charges and payments are displayed in the “Charges & Deposits” column.
- Any pending financial aid is listed in the “Pending Financial Aid” column. This would represent any financial aid that has not yet been credited to your student account
- The amount you owe is listed in the “Total Due” column.


Payment History – allows you to view all of the payments applied to your student account.
Direct Deposit – allows you to enroll in the University’s direct deposit program. You can request any refunds be deposited directly into your bank account.
If you have already enrolled in direct deposit, your account information will be displayed.
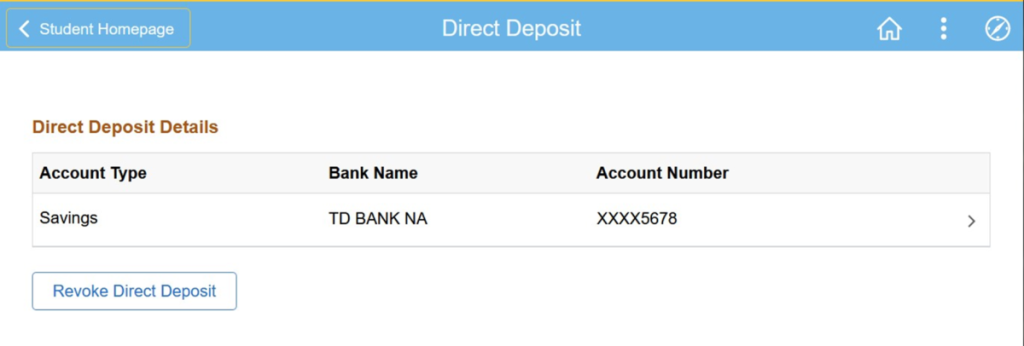
If you click on the account line, a page will be displayed with additional information.
For security purposes, only the last 4 digits of your account number will be displayed.
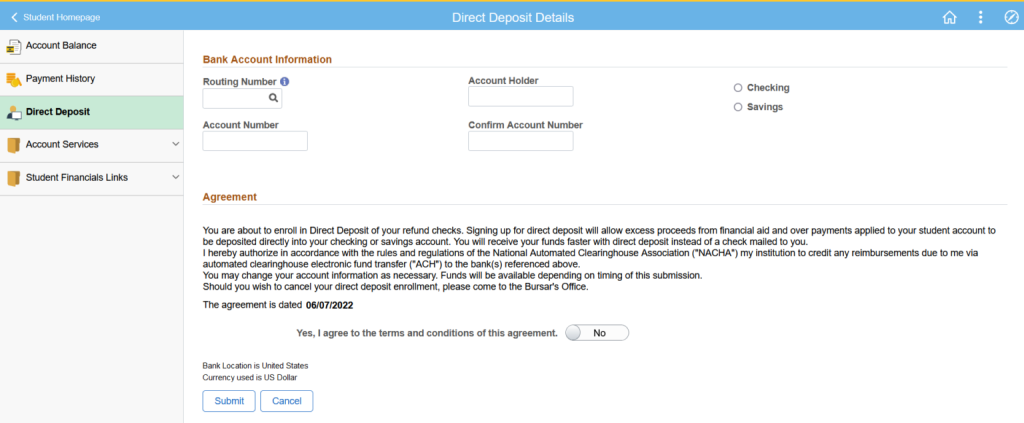
You can make changes to your direct deposit enrollment on this screen. Click the pencil in the top right corner to edit the page. Enter your changes and then click the Submit button. To return to the previous screen without making changes, click the Cancel button.
If you decide you no longer wish to participate in the direct deposit program, you can revoke the election. Click on the Revoke Direct Deposit button.
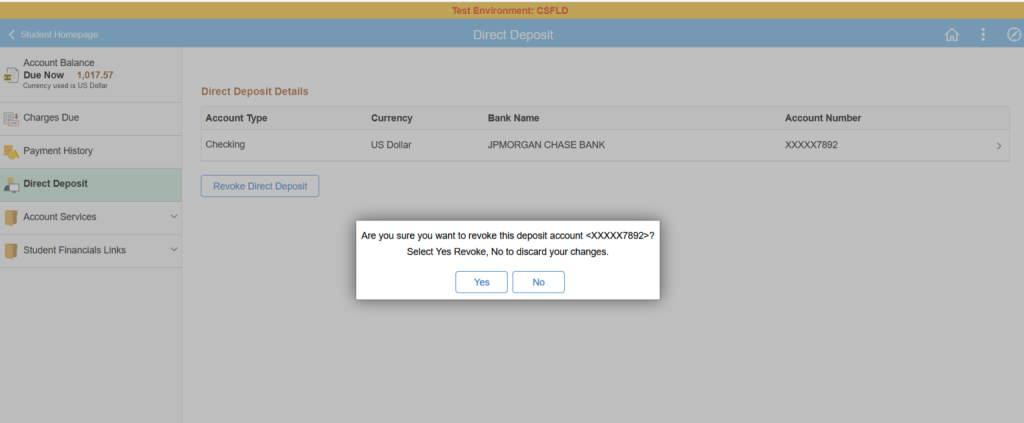
Select Yes to confirm your choice. Your direct deposit information will be removed.
To Enroll in Direct Deposit, click the Enroll in Direct Deposit button.
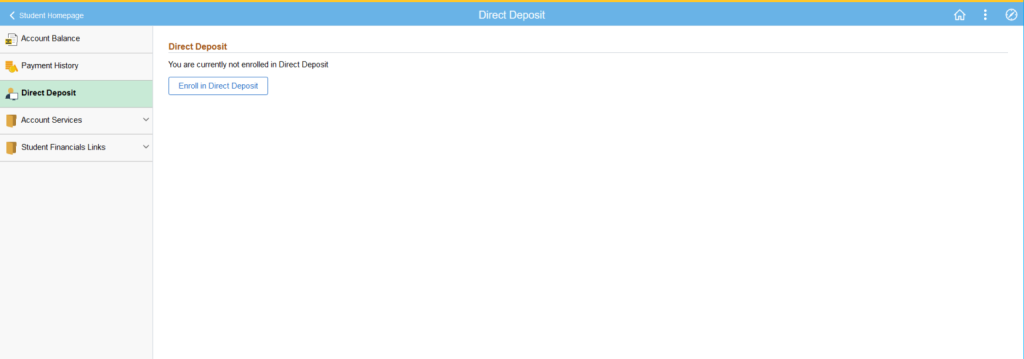
The following screen will appear.

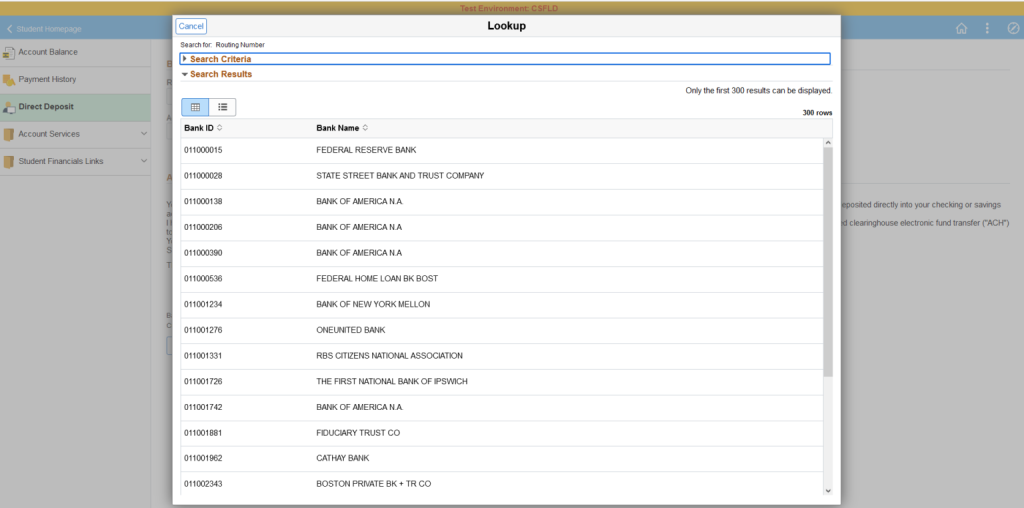
Click on the magnifying glass in the Bank Routing Number box. The following screen will appear displaying a list of available banks. Scroll or search for your bank. Once you find the correct bank, click to select it.
Complete the rest of your banking information and click the button to agree to the terms and conditions. Once completed your screen should resemble the one below.
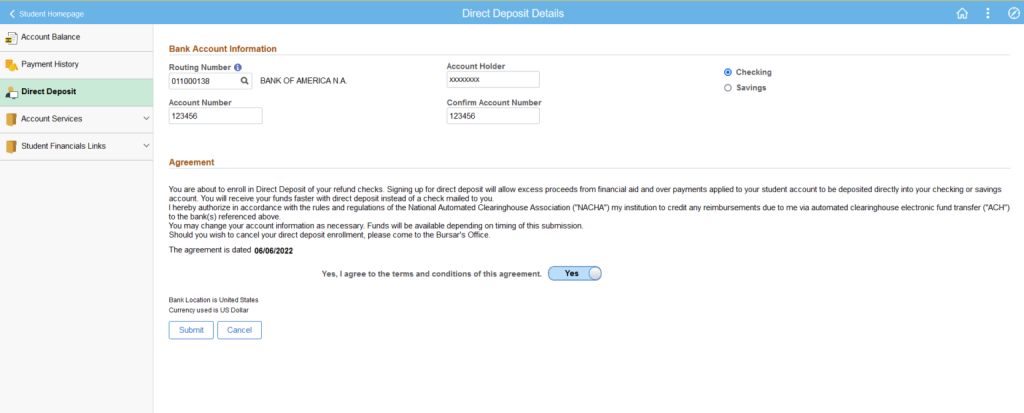
Click the Submit button to complete the enrollment process. Once completed the following screen will be displayed.

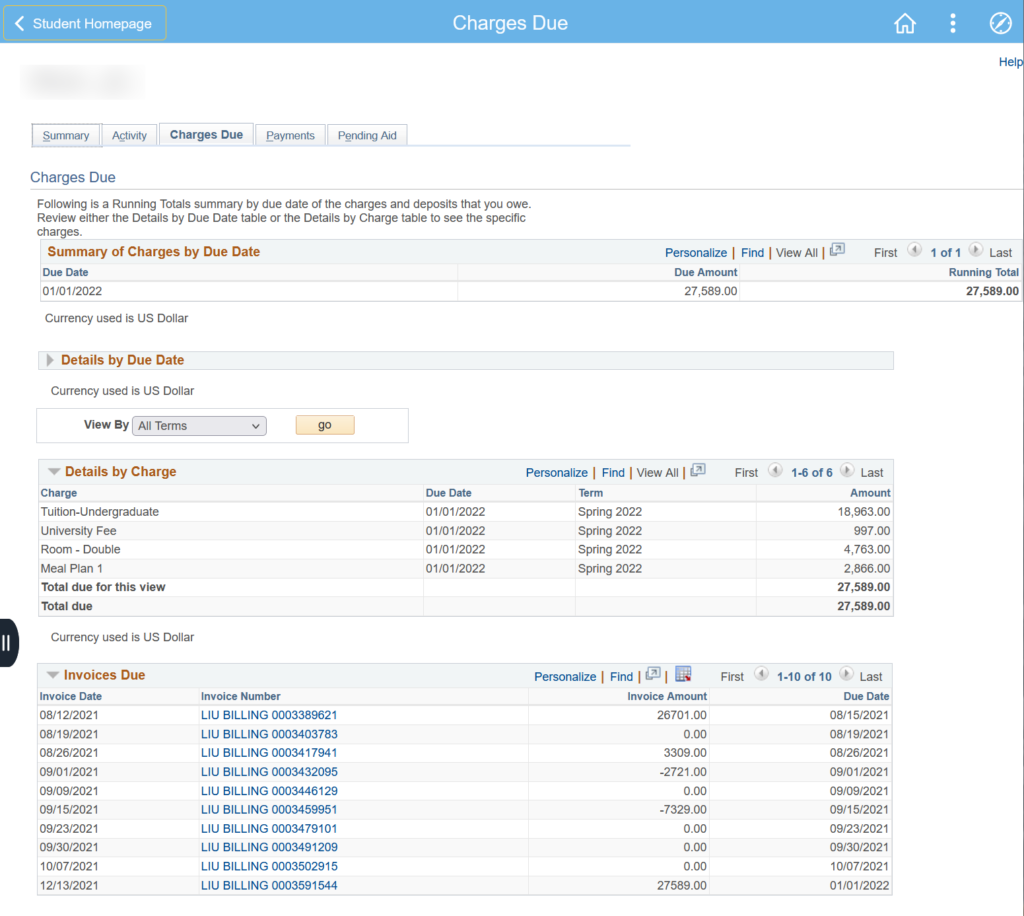
Account Inquiry – allows you to view details about your account. The Charges Due tab is displayed by default. All charges due are listed by due date and amount.
Clicking the Summary tab, will display an overview of your account.
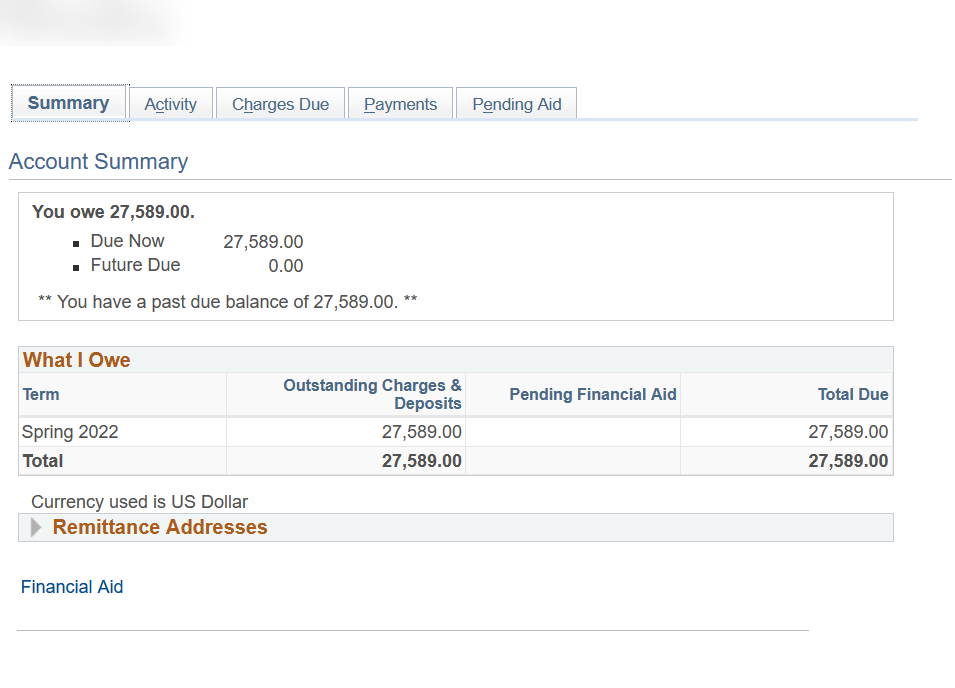
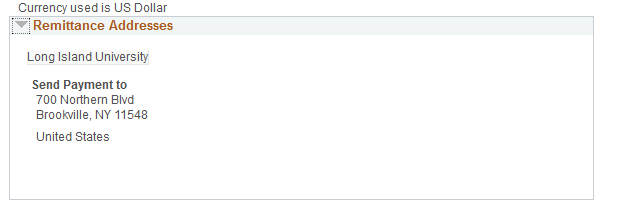
Click on the remittance address arrow to view where payments can be mailed. Payments may also be submitted online through the myLIU Payment Gateway (Refer to the link under Student Financials Links > Make A Payment).
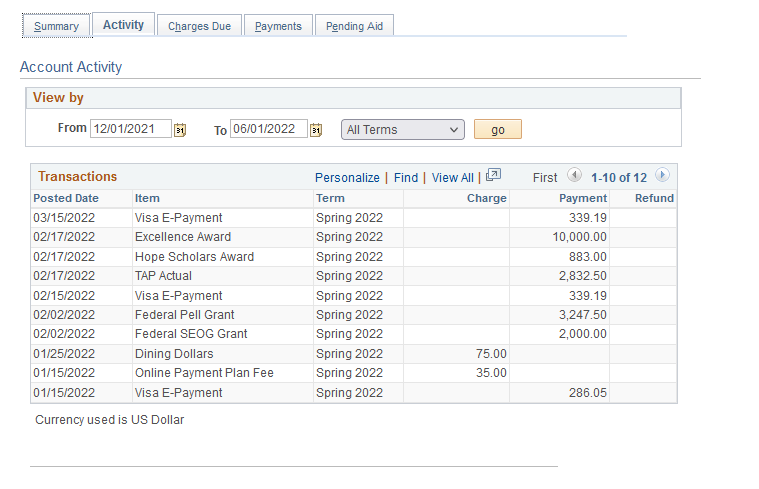
Clicking the Activity tab will display all transactions on your account. Use the From and To fields to change the presentation of account activity.
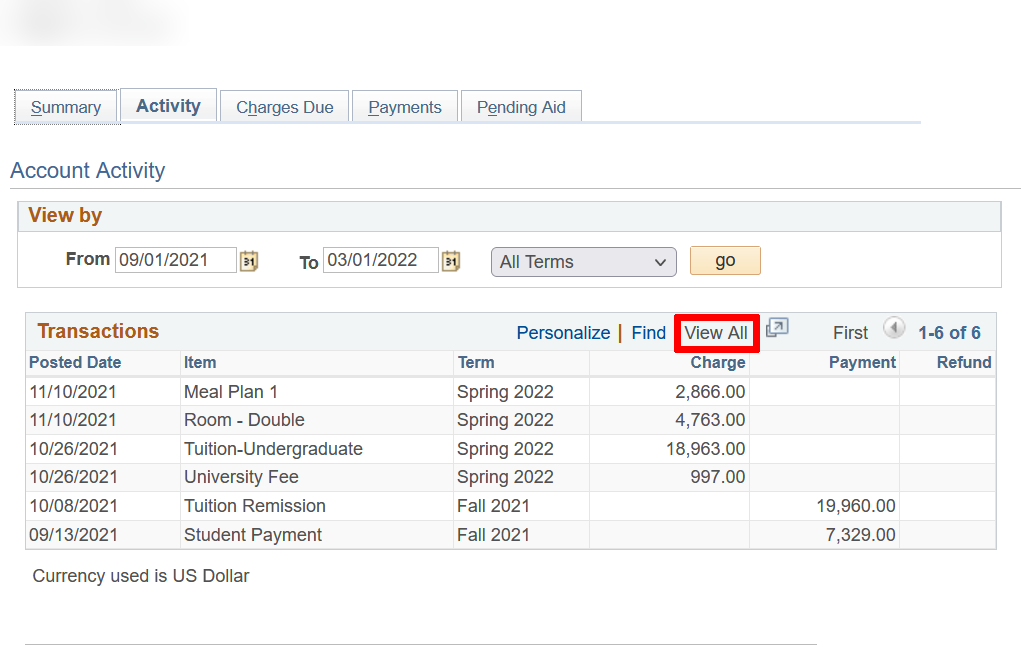
Click “View All” to see all transactions within the period specified.
Click the payment tab to display payments due by date, type and amount. Use From and To fields to view payments from past periods.
Student Financials Links
Make a Payment – This link will open a new window and connect you to the login page of the myLIU Payment Gateway. After logging in you will be able to make payments and sign up for payment plans.
Student Health Insurance – This link will open a new window and connect you to LIU’s Student Health Insurance website. From this page you can research the available student health insurance and enroll if you are eligible.
TAP/HESC – This link will open a new window and connect you to the New York State Higher Education Services website. Use this link to apply and view your TAP application.
Financial Aid
Summary – This page will allow you to see your own financial aid information. You will be able to see the Award Description, Award Status and Net Award.
You can view the information for the entire academic year or for a specific term by changing the selection in the Display box. The default view is “Summary” which displays the academic year.
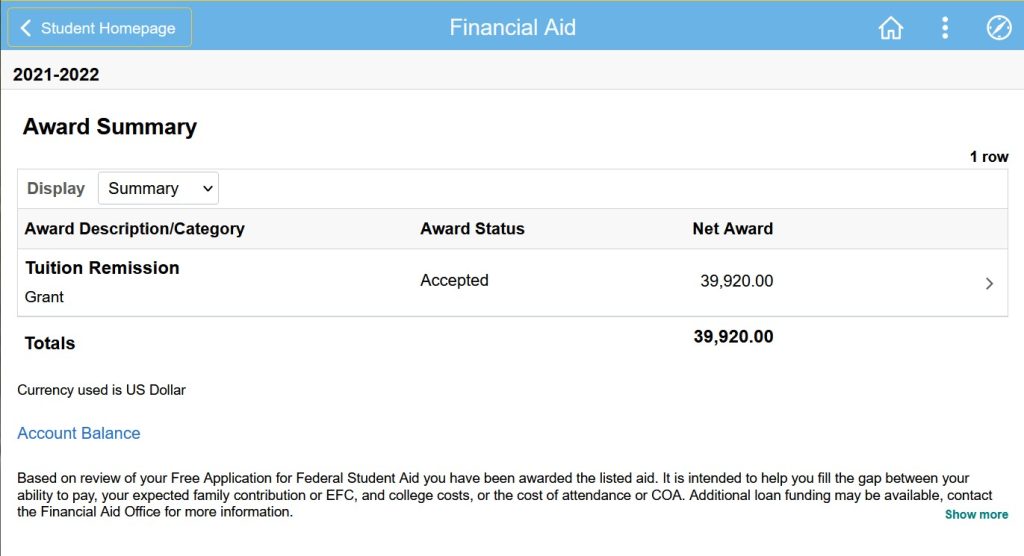
Clicking on a specific award will display the Award Details screen.
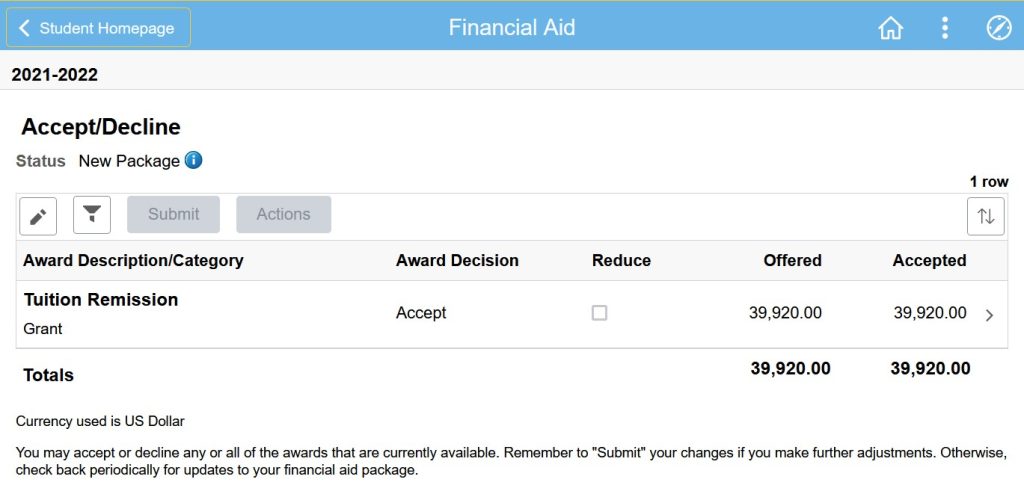
Accept/Decline – This page allows you to indicate which Financial Aid you accept and which awards you wish to decline. You will also have the ability to reduce the amount for certain awards, loans for example. This screen lists the Award Description, Award Decision, Offered Amount and Accepted Amount for each type of financial aid you have been awarded. The award amounts listed here are for the academic year.

Clicking on a specific award, will display the Awards Detail Section.
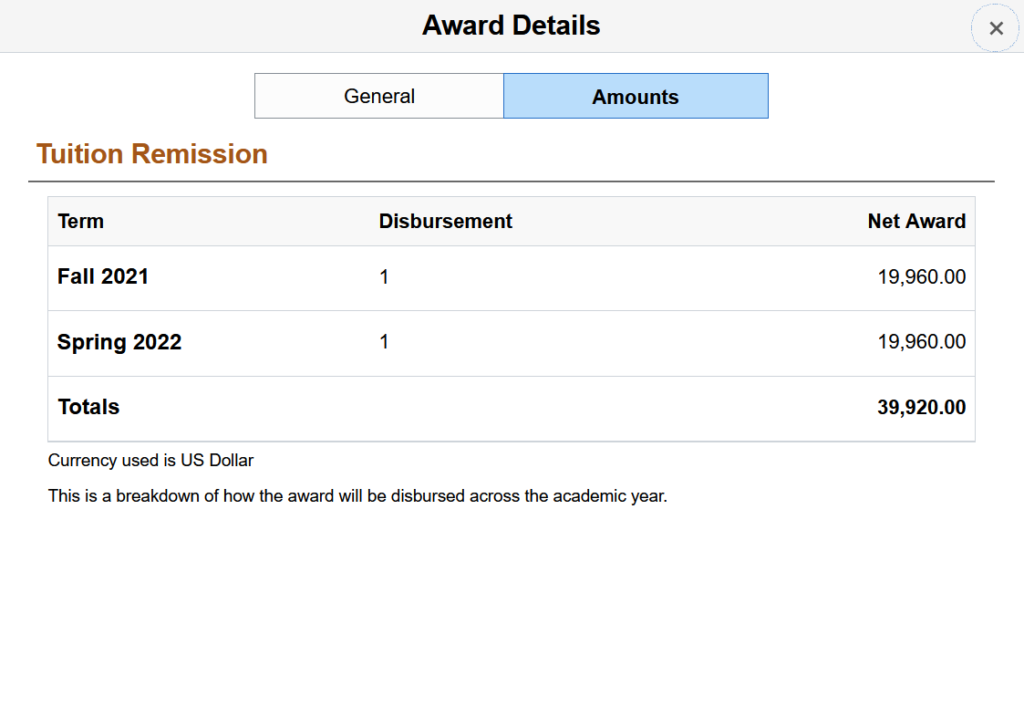
Click the X in the top right corner to return to the Award Summary page.
To Accept, Decline or Reduce an Award, click on the pencil icon. The following screen will be displayed.
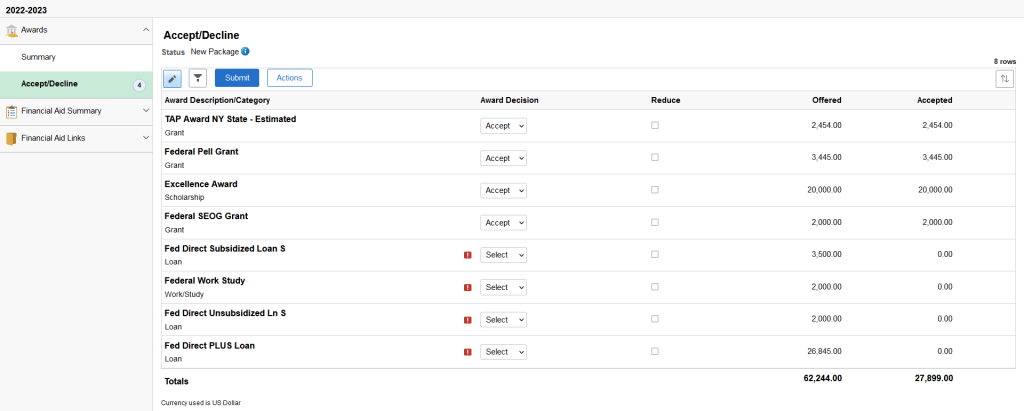
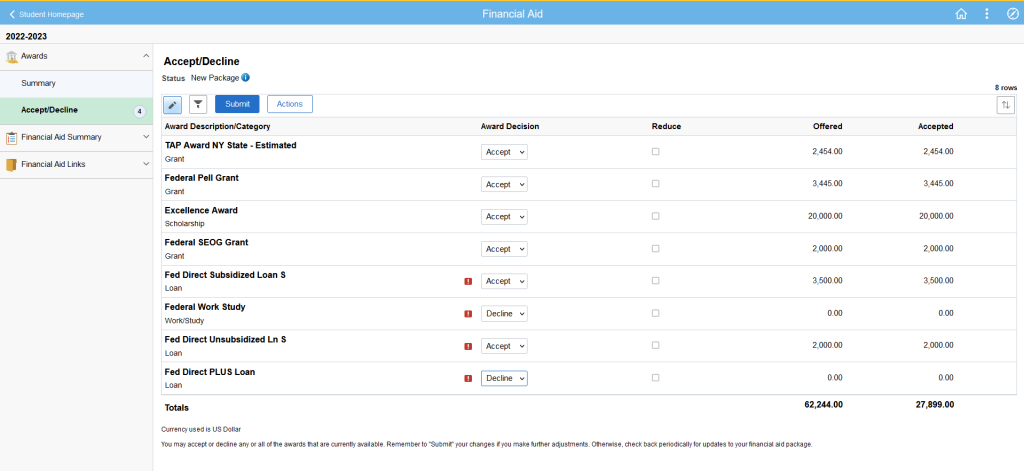
From the drop down box in the Award Decision column, select the appropriate choice. After indicating all of your choices, click the Submit button.
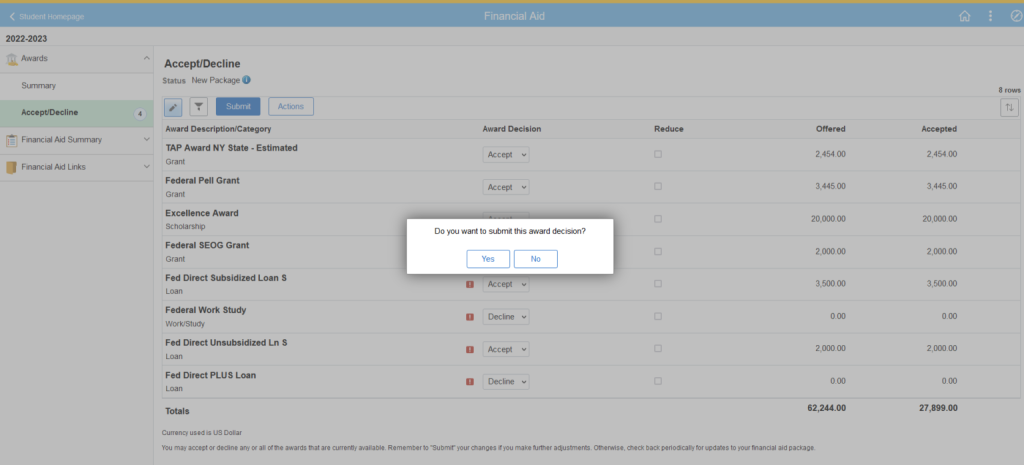
Click Yes to confirm your updates.
Need Summary – displays your financial aid eligibility based on your estimated financial costs, family contribution and estimated need for the aid year. Data is based on the information submitted on your FAFSA form.
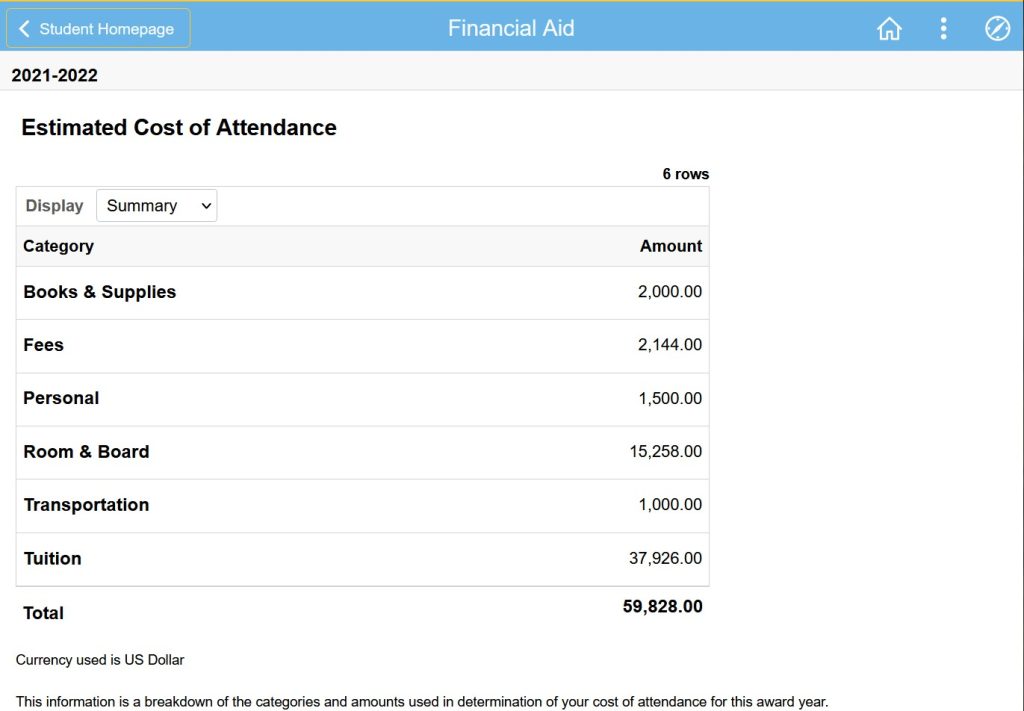
Cost of Attendance – displays a breakdown of the categories and amounts used in determination of your cost of attendance for this award year.
You can view the information for the entire academic year or for a specific term by changing the selection in the Display box. The default view is “Summary” which displays the academic year.
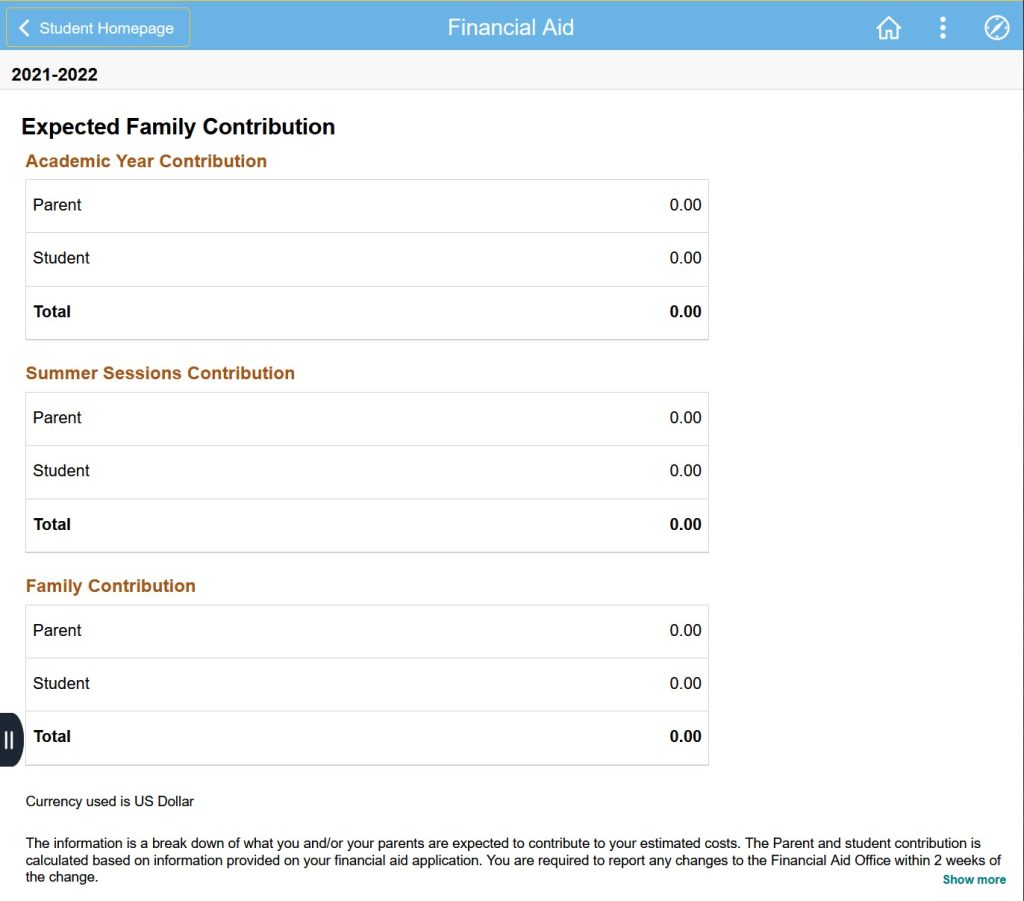
Expected Family Contribution – displays a breakdown of what you and/or your parents are expected to contribute to your estimated costs. The parent and student contribution are calculated based on information you provided on your FAFSA form.
Note: Make sure to check your To Do List for any outstanding items. The financial aid related items on your To Do List must be completed before any financial aid can be finalized on your behalf. In fact, when you complete these items, they will disappear from your To Do List!
If you were offered a loan(s), items on the To Do List can also relate to the acceptance of loans and what needs to be done to actually receive them (Loan Entrance Int. Required), etc.
Financial Aid Links
Complete a FAFSA – opens a new window displaying the Federal Student Aid website. This page is used to complete your FAFSA form necessary to apply for financial aid.
DL MPN & Entrance Interview – opens a new window displaying the Federal Student Aid website. Use this page to complete your Direct Loan promissory notes and conduct your Entrance Interview. These steps are necessary in order for your student loans to be credited to your student account.
Exit Interview – opens a new window displaying the Federal Student Aid website. Use this page to complete your Exit Interview.
Manage Classes
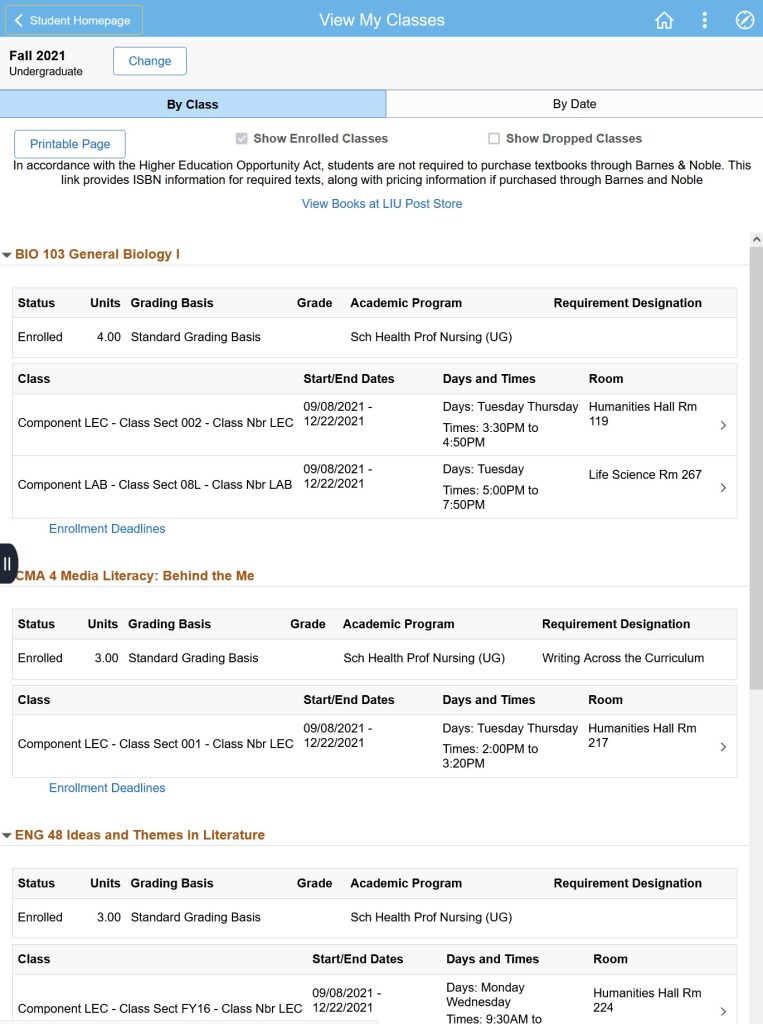
View My Classes allows you to view and print your daily or weekly schedule.
Click the term you wish to view…

You can view your schedule By Class or By Date
By default, your class schedule displays By Class which lists your schedule by class.
My Class Schedule – By Class View
My Class Schedule – By Date View
The By Date View displays your schedule by weekday. If courses do not appear, make sure the start and end times as well as dates are set to include evening hours and semester dates.
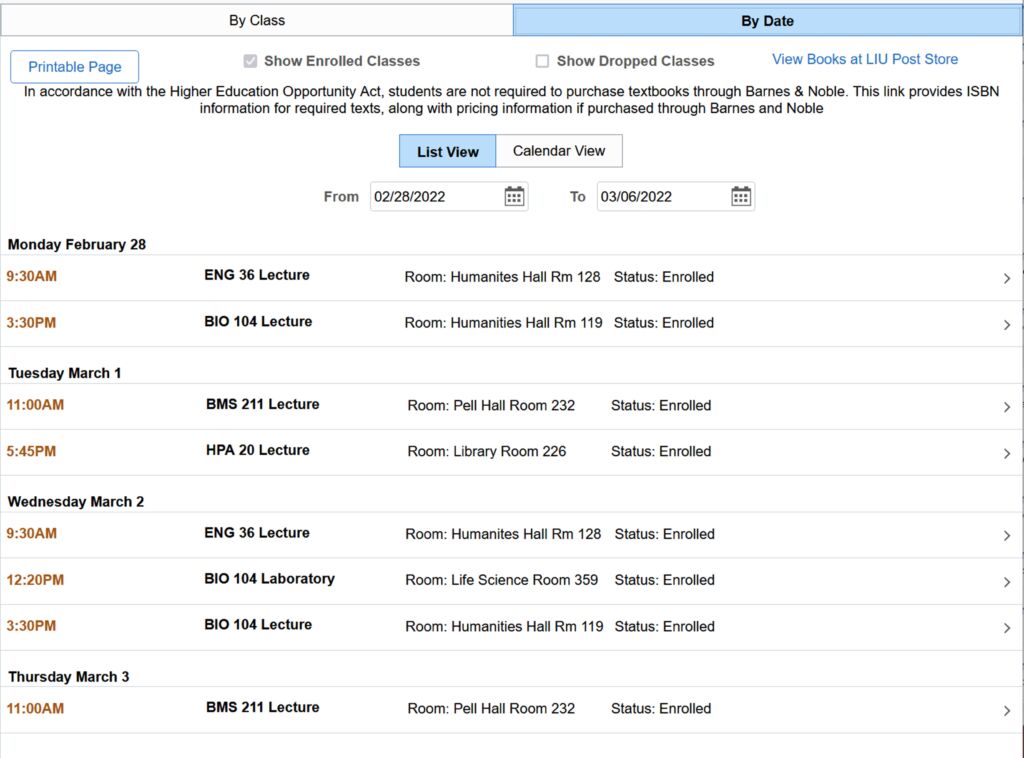
To print your schedule from either view, click the Printable Page button.
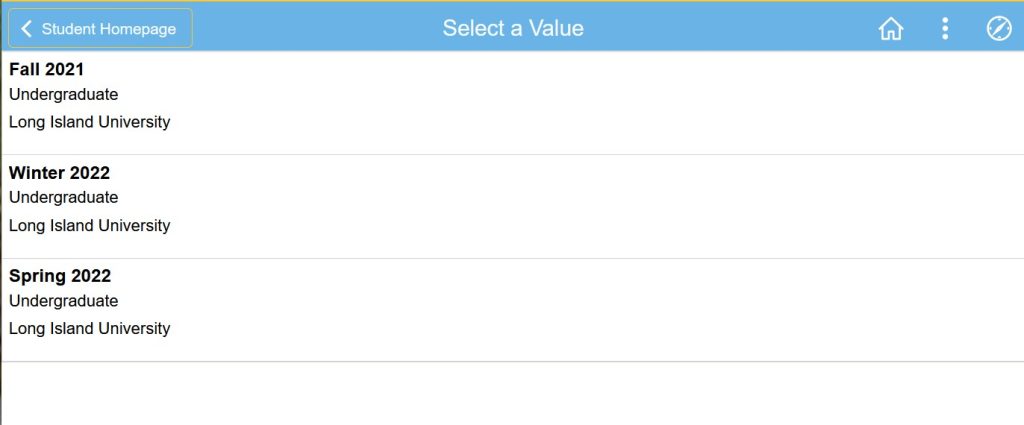
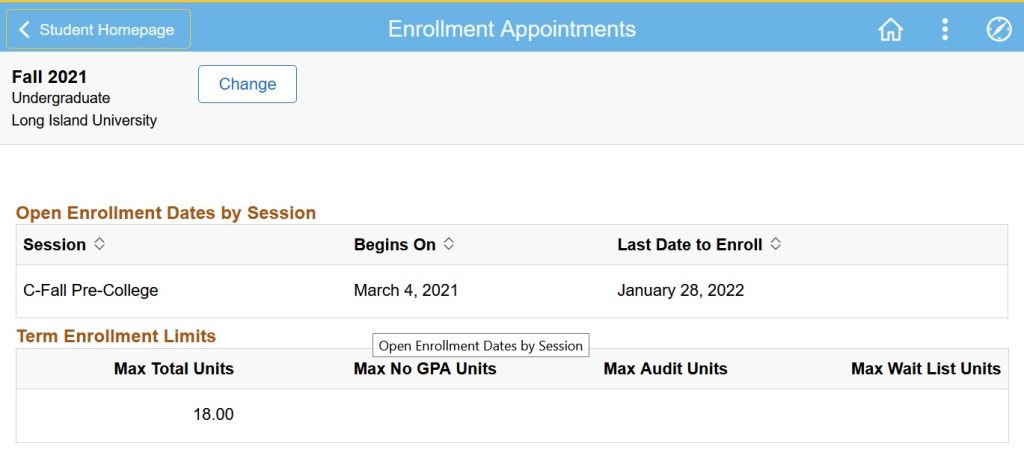
Enrollment Appointments allows you to view the registration beginning and ending dates for the specified term. Select the term you wish to view.
Shopping Cart allows you to enroll in multiple classes at one time. If you have not added any classes to your cart, the following screen will appear.
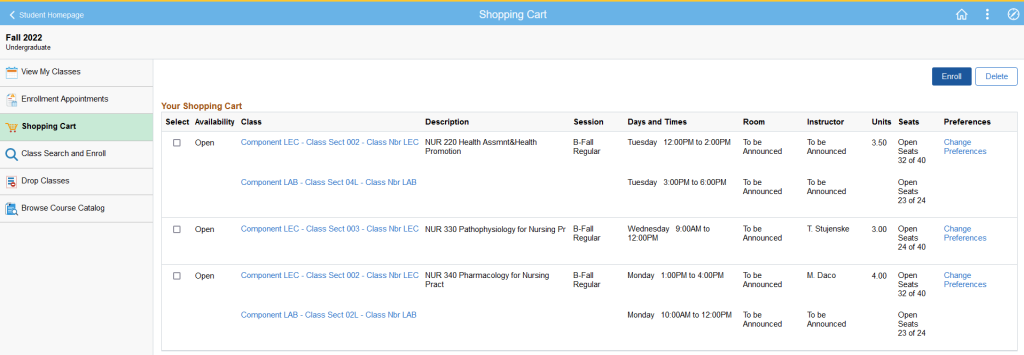
If you have selected the Add to Shopping Cart option when enrolling for classes, they will appear here. You are able to enroll in all of the classes in your cart or you can remove individual classes.
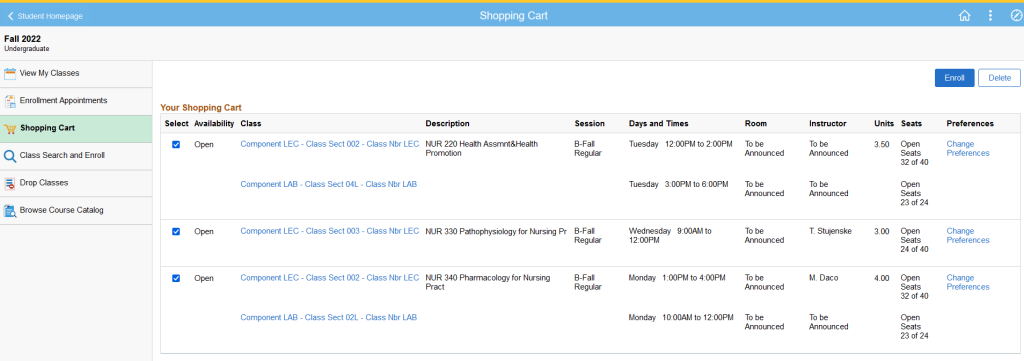
To enroll in the courses in your cart, select the courses by clicking in the box in the Select column. After the courses have been selected, click the Enroll button in the upper right corner.
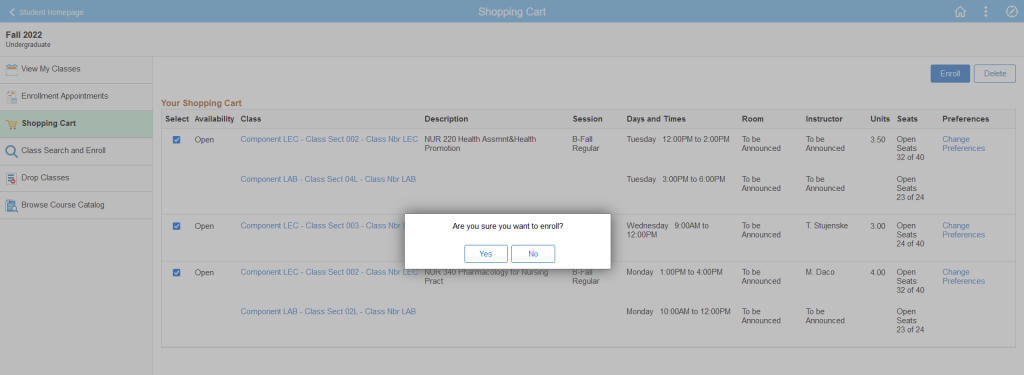
Confirm you want to enroll in the specified class by clicking the Yes button.
A confirmation page will be displayed and your enrollment is complete.

Class Search and Enroll allows you to view the classes being offered and add them to your schedule.
Click on the term you are interested in registering for.

The class search page will allow you to search for classes being offered in the requested term. You can search by a number of different keywords, including course, subject and topic.
Enter you search keywords in the search box and click the arrow to continue. A list of possible matches will be displayed.

Clicking on a specific course will show the available class sections. Click on the section you wish to enroll in.
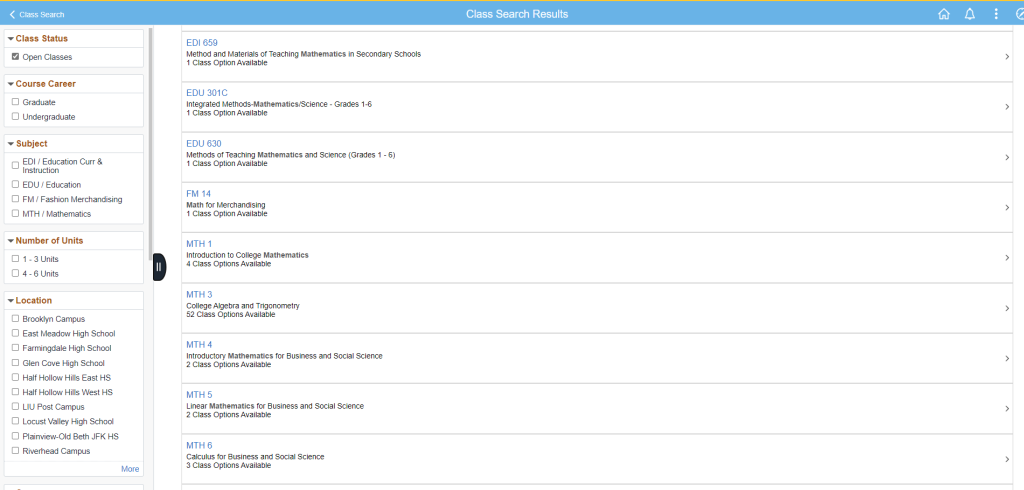
Note that if you do not see the > arrow on the far right side of the section list for a class, it means you are unable to enroll. Please check if you have any holds or To Do items under the Tasks tile on the main page.

Review your selection and click the Next button (top right corner of the screen)

If you need special permission to enroll in this class, enter the code here. If not click the Accept button.

You now have the option to either Enroll in the class or Add to Shopping Cart.
- The Enroll option will allow you to enroll in one class at a time.
- The Add to Shopping Cart option will allow you to select all your courses and then complete the enrollment process once.
Method 1 – Select the Enroll option and click the Next button.

Review and Submit is the final step in the enrollment process. Confirm your selection is correct and then click the Submit button.

Confirm you want to enroll in the specified class by clicking the Yes button.

A confirmation page will be displayed and your enrollment is complete.

Method 2 – Select the Add to Shopping Cart option and click the Next button.
Review and Submit is the final step in the enrollment process. Confirm your selection is correct and then click the Submit button.

Confirm you want to enroll in the specified class by clicking the Yes button.
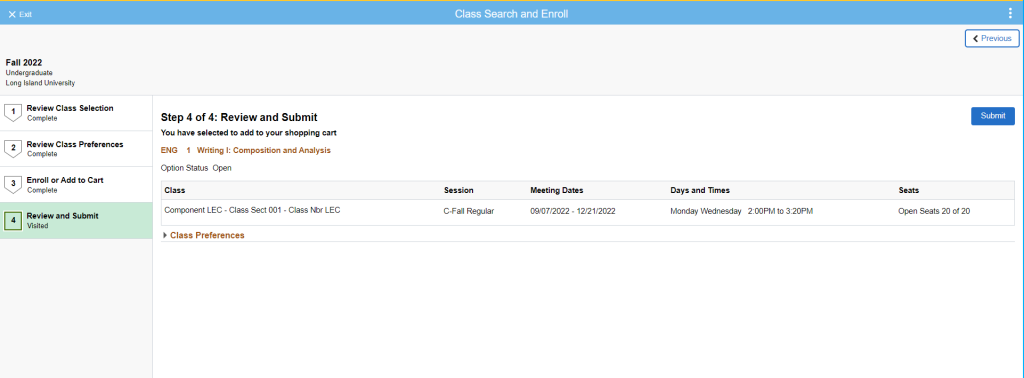
A confirmation page will be displayed indicating the course has been added to Shopping Cart.
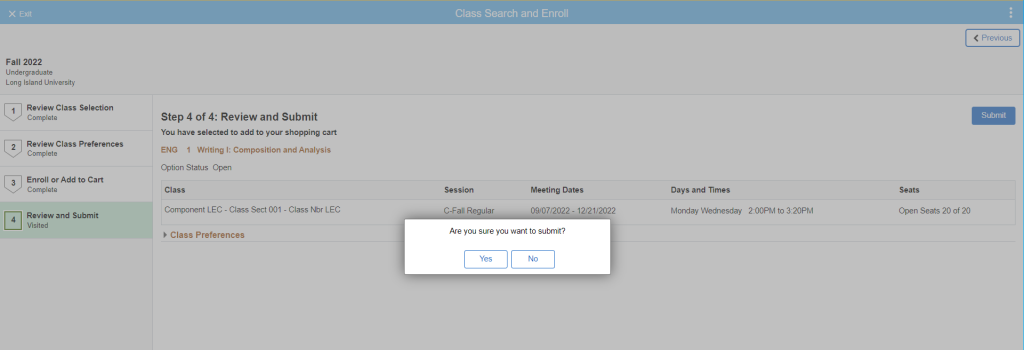
Note: If you selected the Shopping Cart option, you are not enrolled in the class yet. You must view your Shopping Cart to complete the enrollment process. Refer to the instructions under the Shopping Cart menu.
Drop Classes – Will allow you to withdraw from a class
Click on the term you wish to view.

All of the classes you are registered in for the specified term will be displayed.
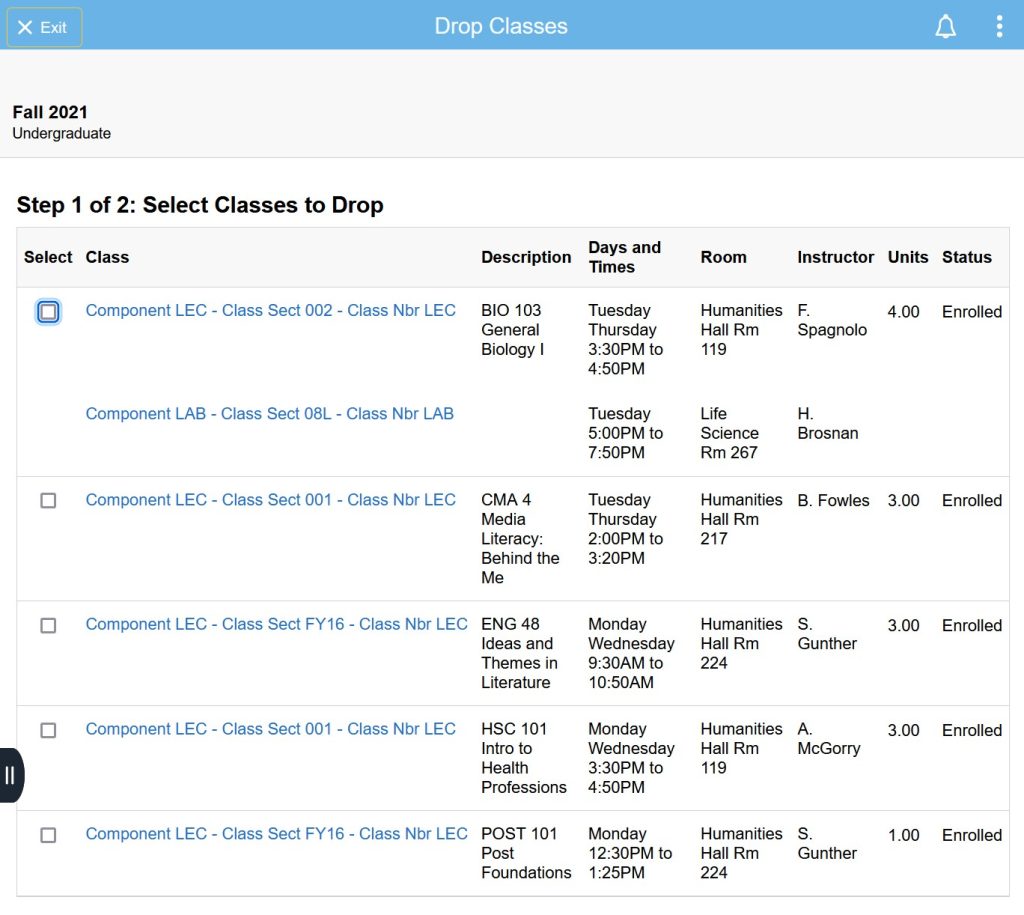
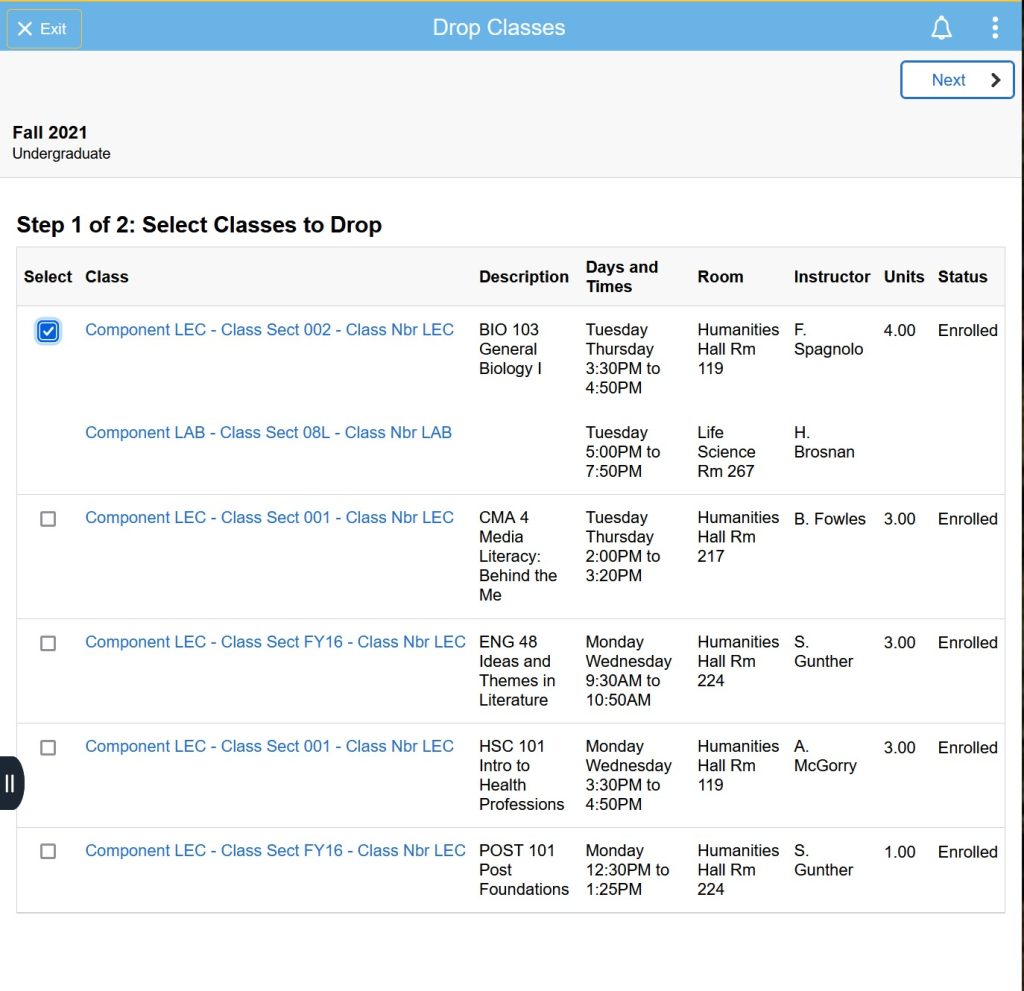
Select the class you wish to drop by clicking in the box under the Select column and then click the Next button in the top right corner.
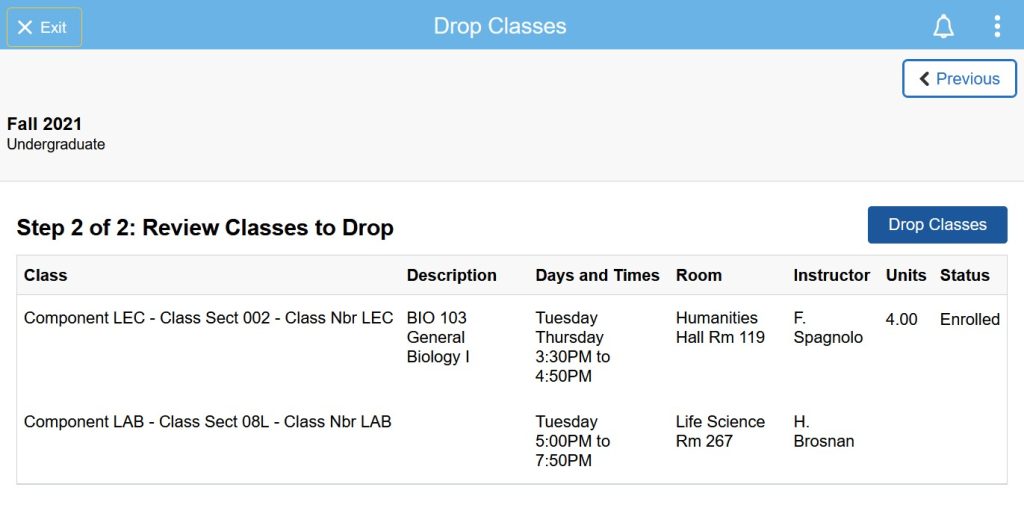
Confirm that you wish to drop the classes by clicking the Drop Classes button.
Confirm you want to enroll in drop the specified class by clicking the Yes button.

A confirmation page will be displayed.

Browse Course Catalog will allow you to search for course information. You can search by a number of different keywords, including course, subject and topic.
Enter you search keywords in the search box and click the arrow to continue. A list of possible matches will be displayed.
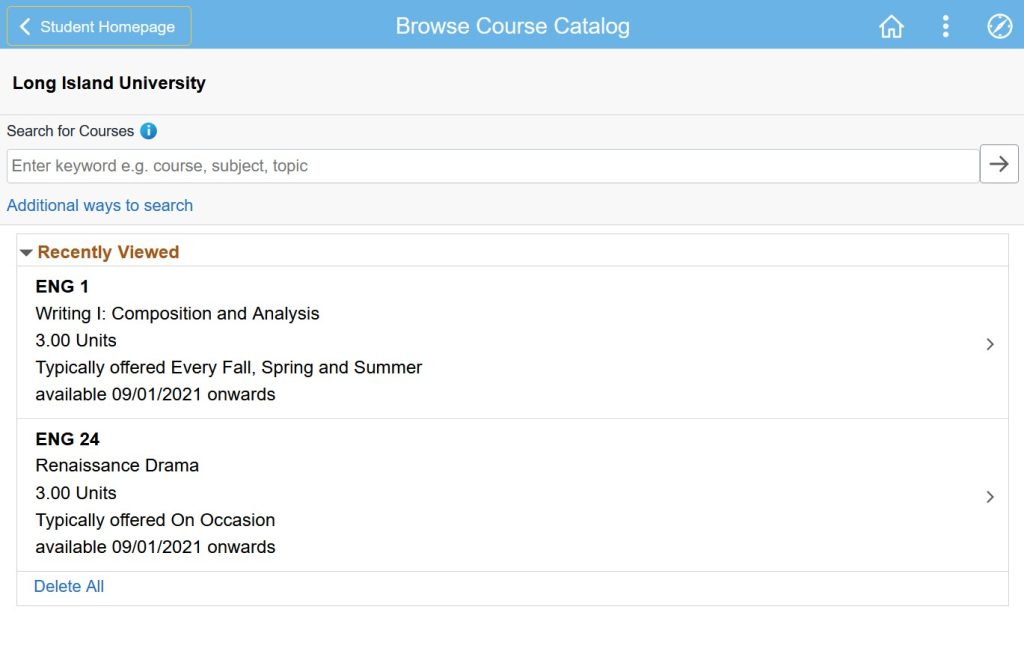
Clicking on a specific course will display additional information about that course.
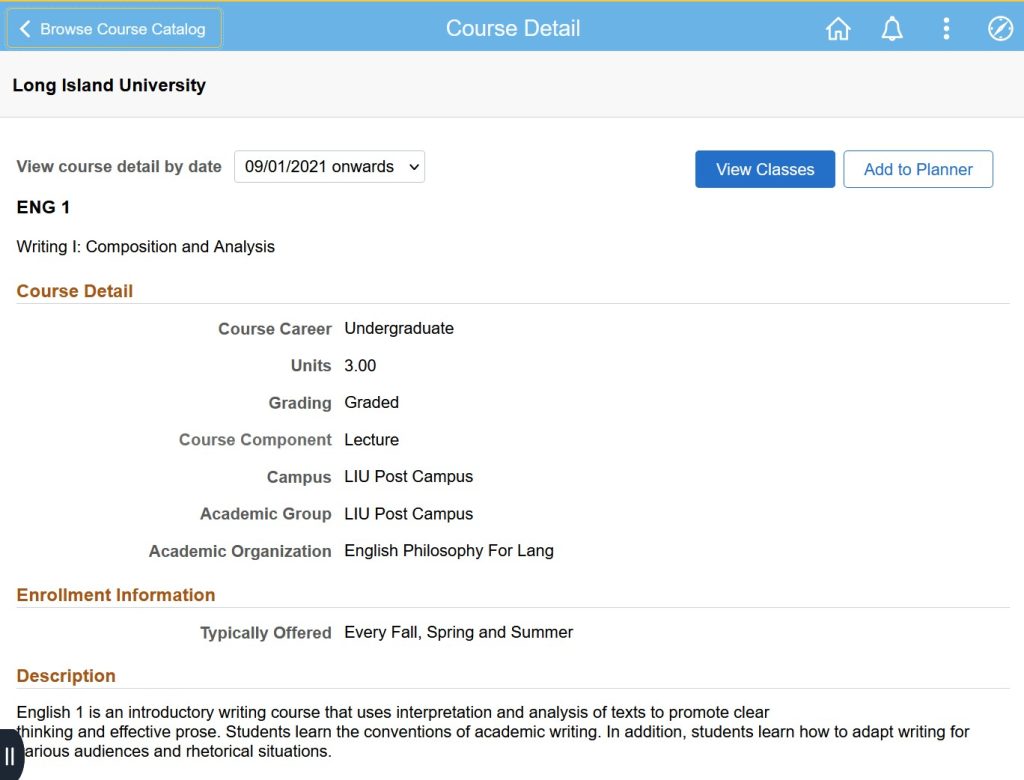
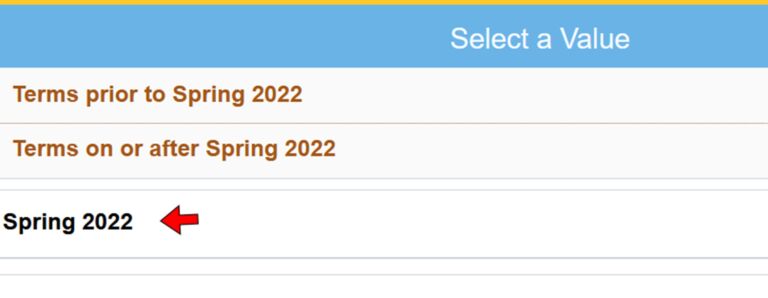
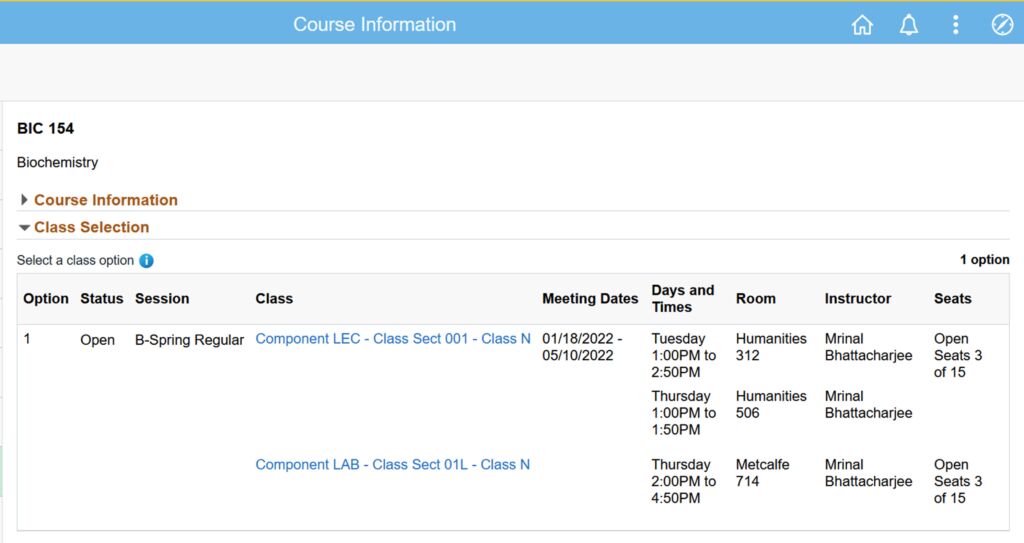
Clicking the View Classes button will display a list of terms. After choosing a term, a list of when the class is being offered for the specified term will be displayed. If you click on a course section, you will be given the opportunity to enroll in the class if the enrollment period is open.
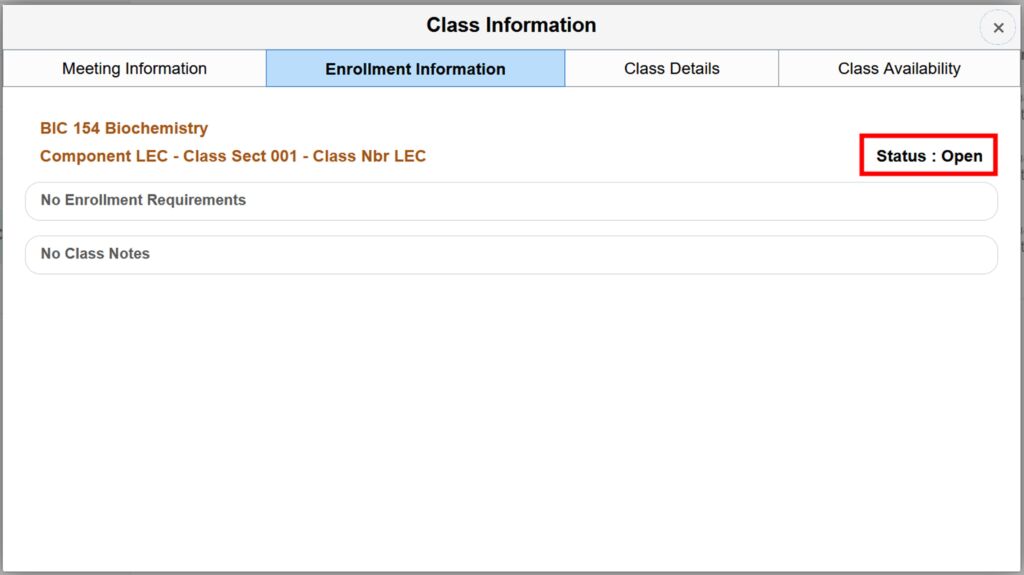
Profile
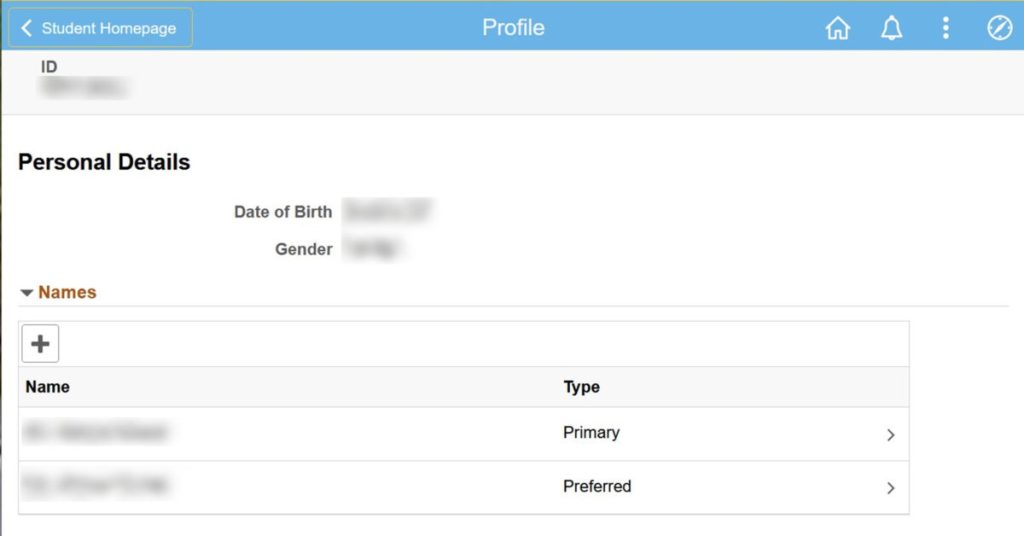
Personal Details – displays the biographical information that LIU has on your official record. This screen displays your ID number, Date of Birth, Gender and Name. You can have more than one Name Type.
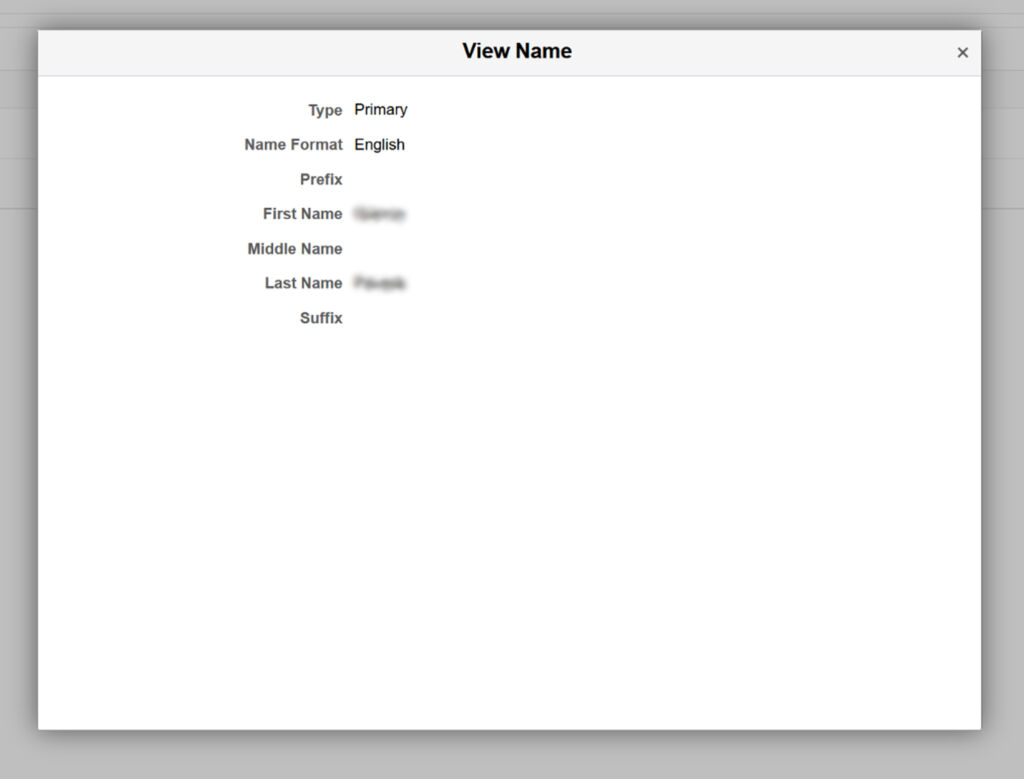
Clicking on one of the name rows will display the name details page.
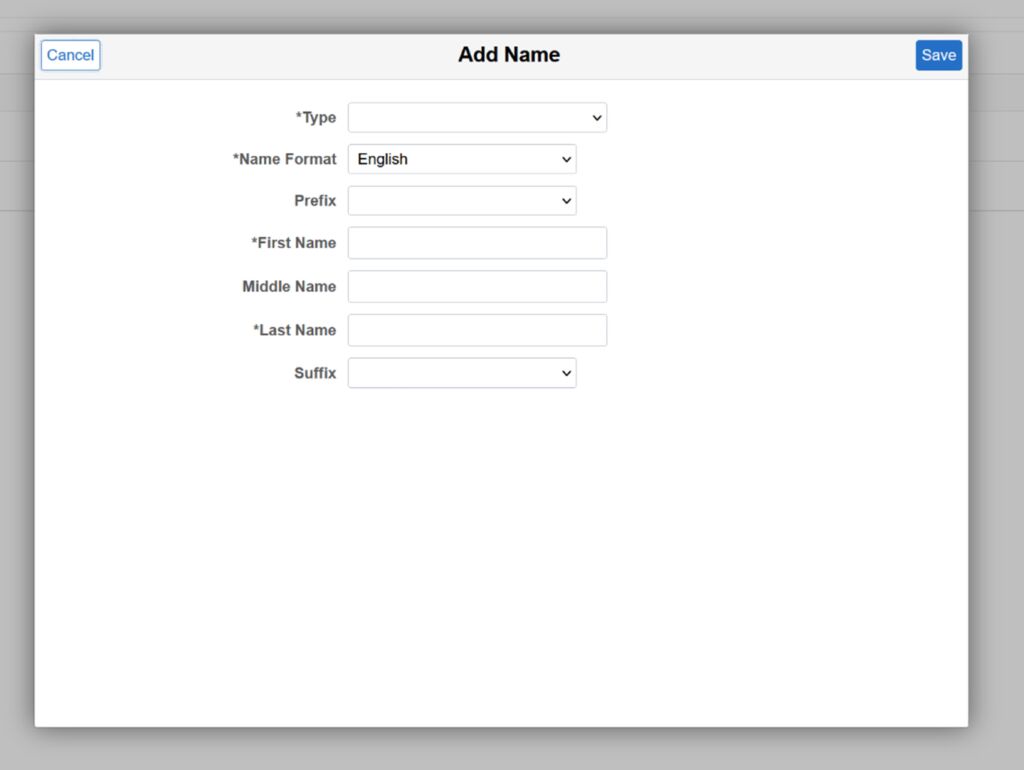
To Add an Additional Name Type, click the plus (+) button above your name. The Add Name page will be displayed. Select the appropriate name type from the Type Drop-down box, choices include Degree, Legal, Maiden, etc. Enter the information in the applicable name fields and click the Save button.
Contact Details – displays all of the email addresses and telephone numbers that LIU has on your record.
Email – Your myLIU email address will be listed as preferred. You are not able to change or delete your myLIU email address. You may add or delete any additional email addresses.
Phone – Any phone numbers that LIU has on your record will be displayed here. You can add or delete any phone numbers. Refer to the instructions for updating Email addresses.
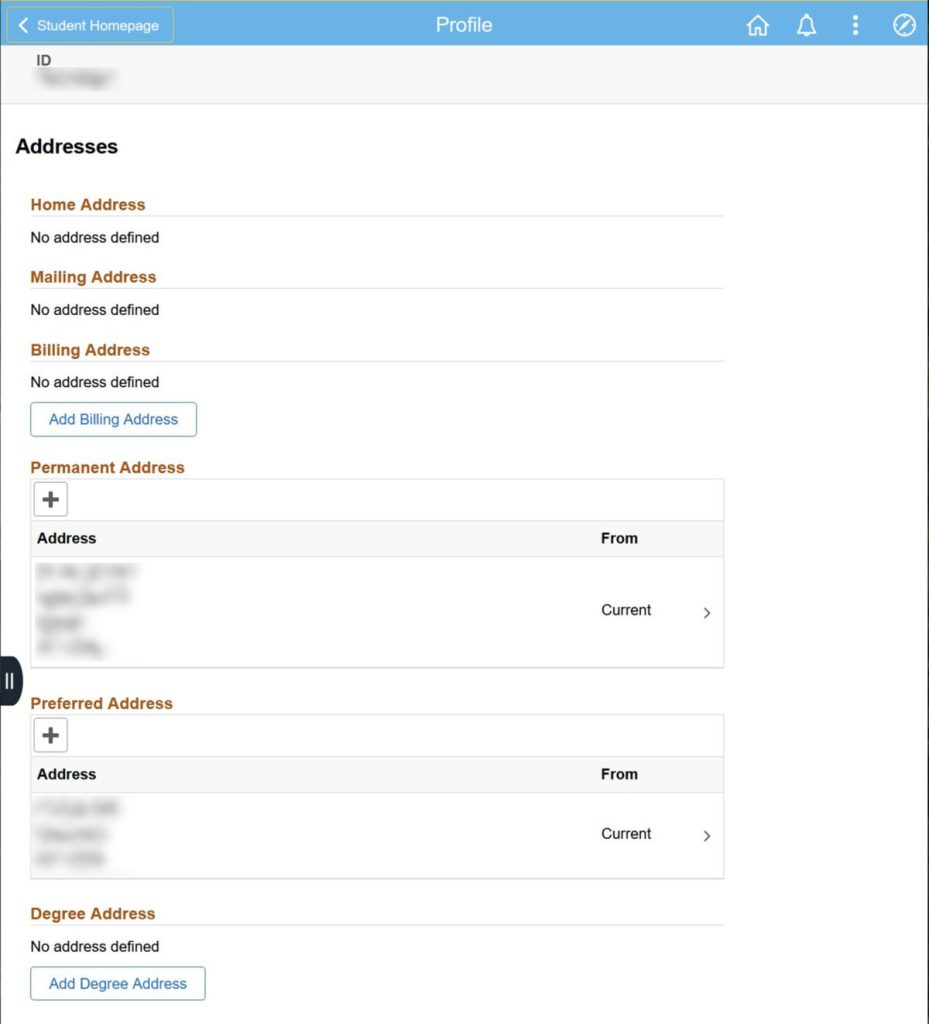
Address – Any addresses that LIU has on your record will be displayed here. You can add or delete addresses.
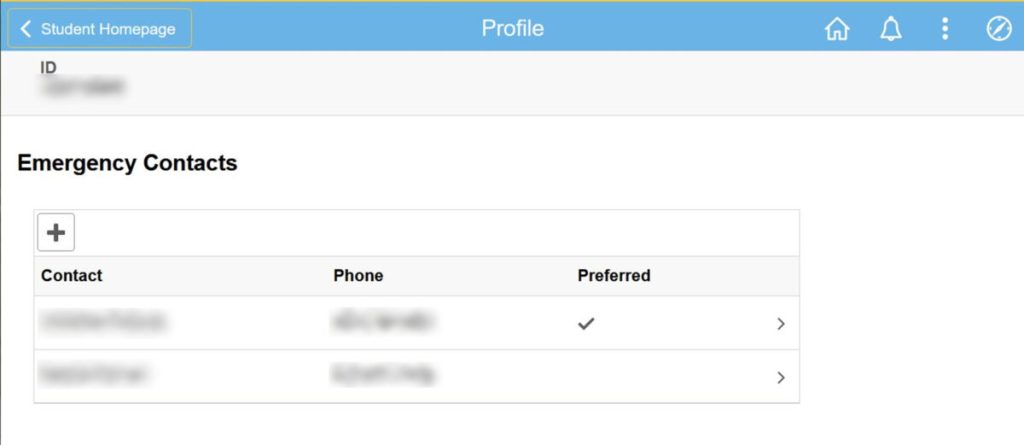
Emergency Contacts – Your emergency contacts will be displayed here. You are able to add, update or delete these contacts.
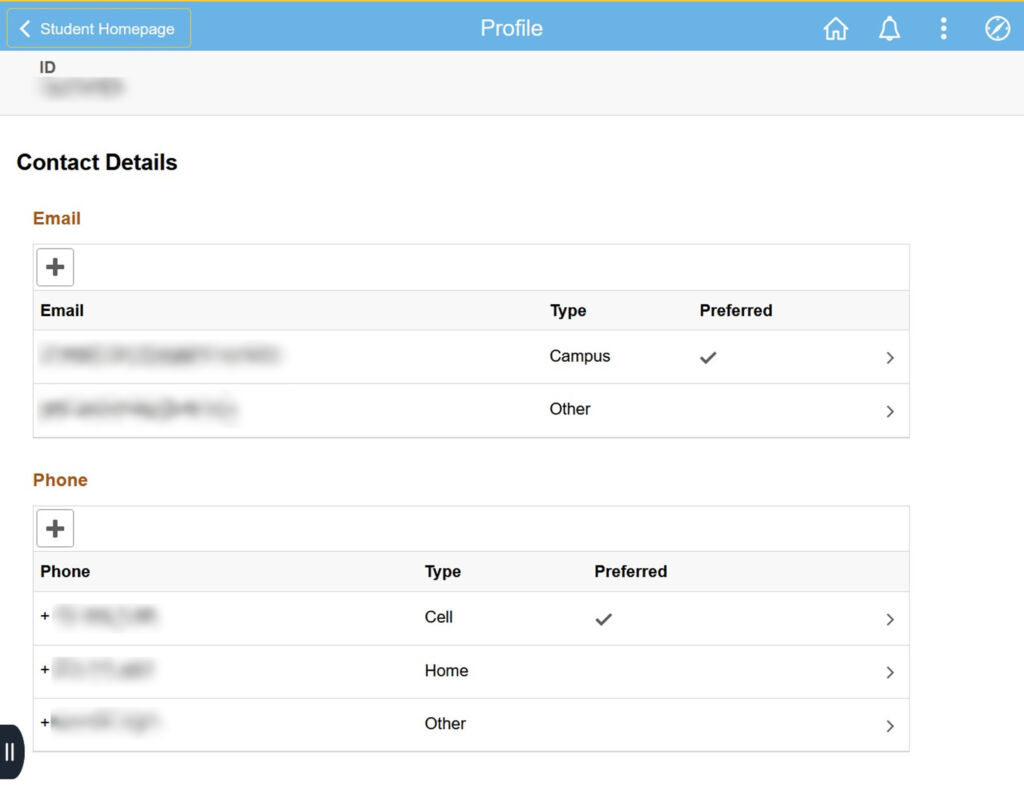
To add an email address, click the plus (+) sign. The Add Email box will be displayed.
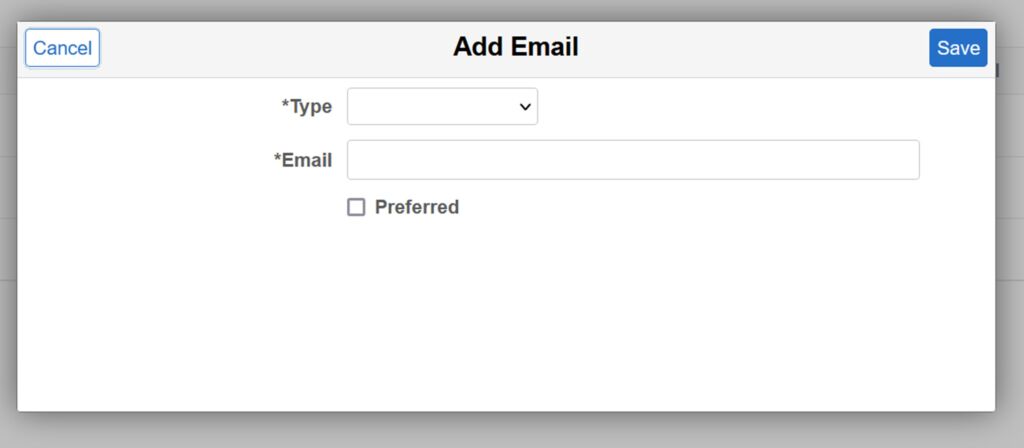
Select a Type from the drop-down menu, choices include Home, Business, Other, etc. Enter your email address and click the Save button.
To delete an email address, click on the row you wish to delete. The Edit Email box will be displayed.
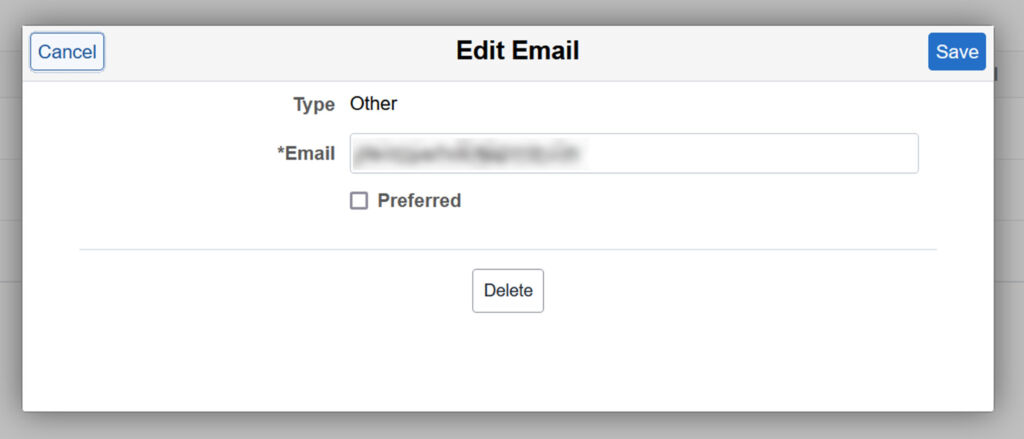
Click the Delete button to remove this email address from your record. Confirm the deletion by click the Yes button.
Tasks
To Do – The To Do List menu displays remaining documents and actions required to complete tasks for Admissions, Financial Aid, and other departments within the University. When you click on a task, you will be able to see more information about items on the To Do List and which office to contact to complete them.
The financial aid related items on your To Do List must be completed before any financial aid can be finalized on your behalf. In fact, when you complete these items, they will disappear from your To Do List!
If you were offered a loan(s), items on the To Do List can also relate to the acceptance of loans and what needs to be done to actually receive them (Loan Entrance Int. Required), etc.
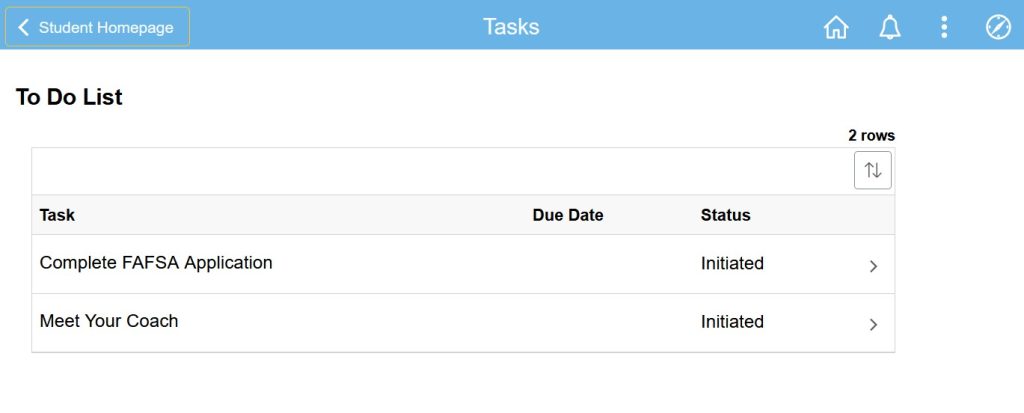
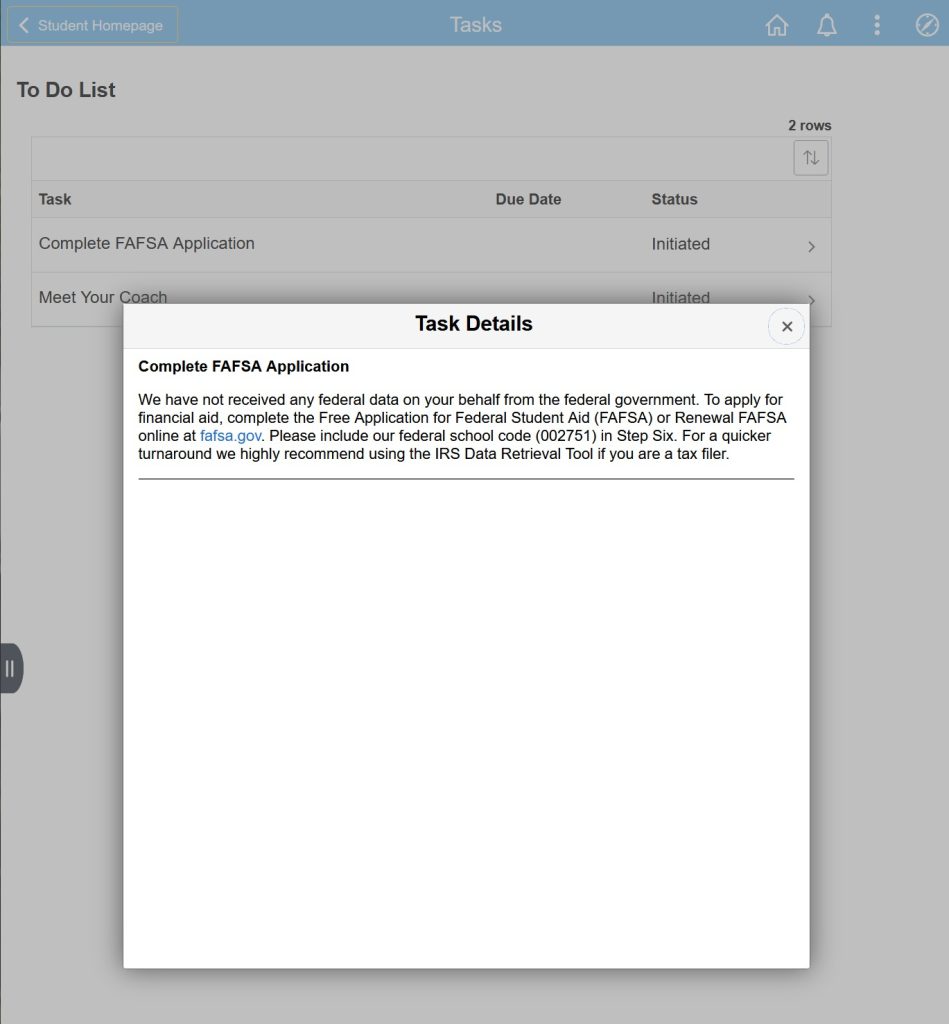
Clicking on a To Do List item will display the task details and explain what needs to be done to complete the task.
Holds – The Holds menu allows you to view hold information placed on your account that will prevent you from accessing or engaging in select University activities. When you click on the Hold you will be able to see which office placed the Service Indicator or Hold on your record and you can contact them for information on how to remove this Hold.
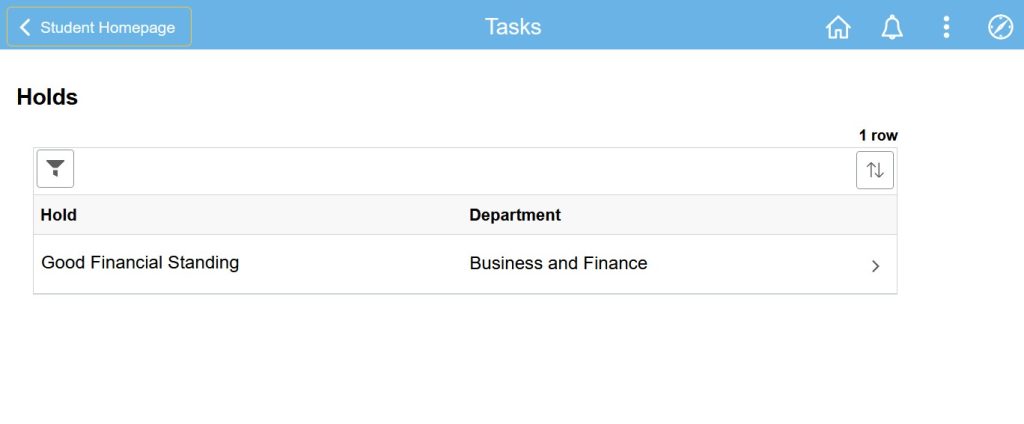
Clicking on one of the holds will display the hold details and who to contact to assist in resolving the issue.
For Faculty
Submitting Final Grades
The MyLIU portal provides students with convenient access to information about their records. By logging onto the portal, students may view their schedule of classes, register for courses, obtain their grades, request transcripts, and apply for graduation. They may also view financial aid awards, billing information, make online payments, accept and decline federal loans and Federal College Work Study, and make an appointment to see counselors. For more information, please visit or contact the helpdesk at Browse, LIU Brooklyn’s technology store.
Before continuing: If you do not have access to MYLIU for grading send an email to it@liu.edu to make a request. Once a PeopleSoft Access form is filled out, signed and returned to the IT or ITRC department you will be granted access.
Step 1
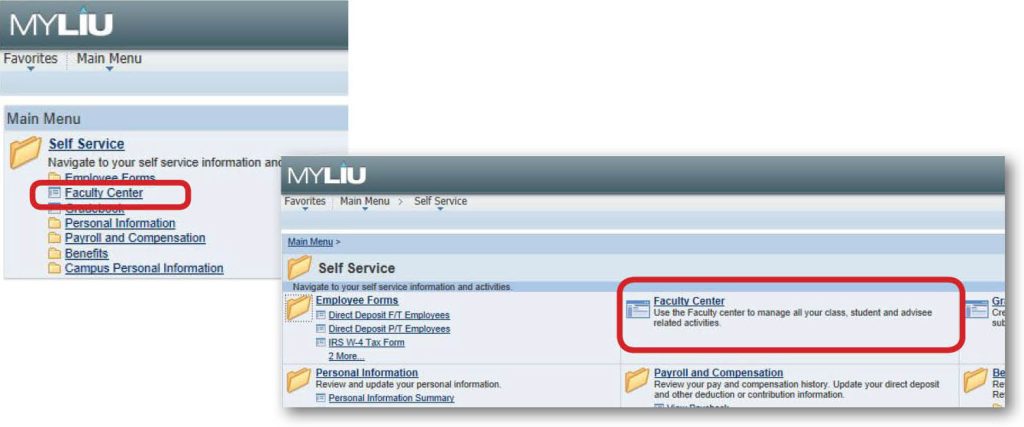
In Order to grade your students, you must first login to the MYLIU portal with your LIU credentials. Then under the Self Service menu item, click on Faculty Center.
Step 2
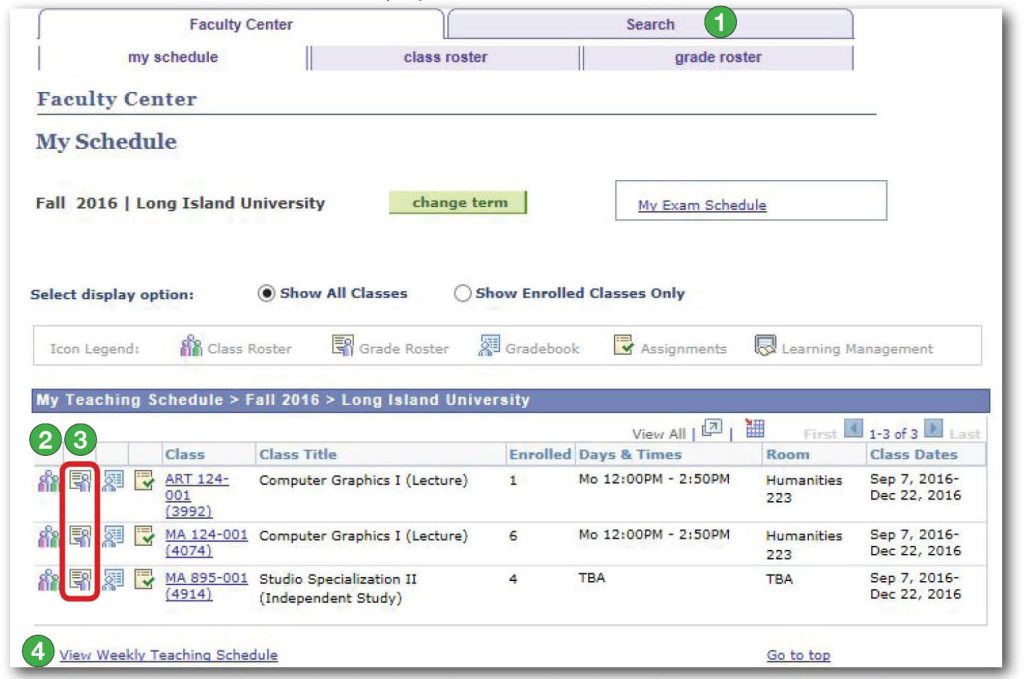
Click on Grade Roster (#3)
- Tabs at the top of each page that now include the “Search” function.
- Class Roster button.
- Grade Roster button.
- Link to view your teaching schedule.
Note: If you do not see the grade roster icon, then your class has not been opened for grading or you may not be properly attached to the course. Please contact the Registrars Office. Note 2: If you do not see your class listed on this page, click on the change term button and select the correct term for grading.
Step 3
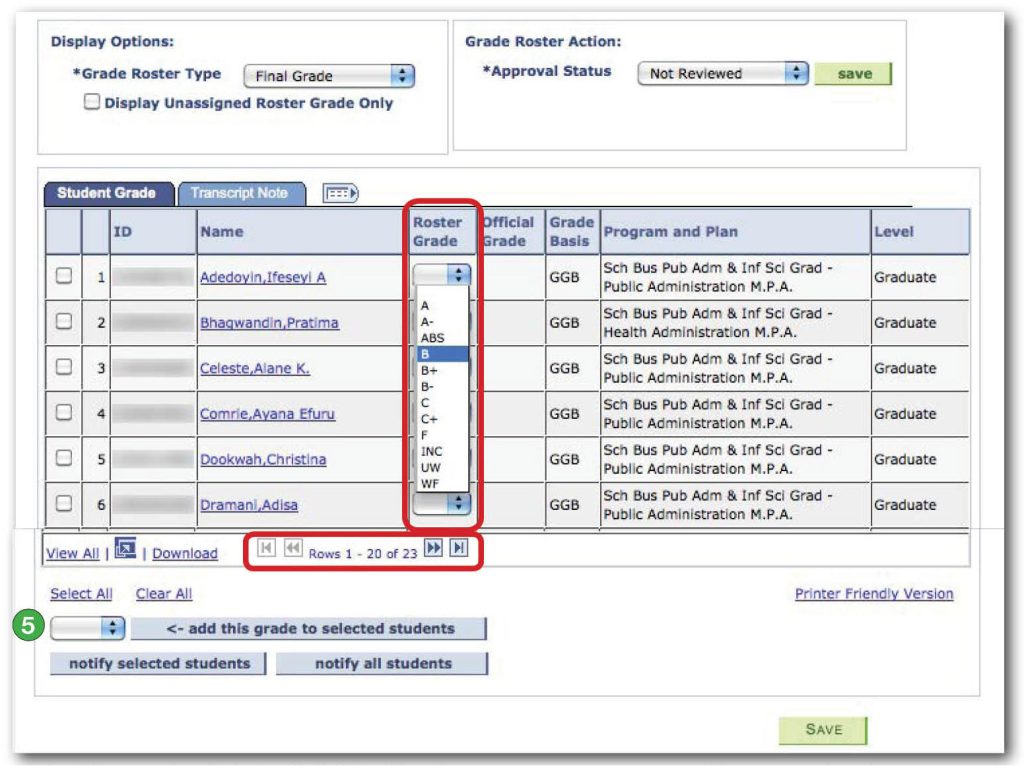
Enter your grades in the Roster Grades column. If you have a large class, make sure to check if there are multiple pages. 5. Assign a grade to multiple selected students Note: Be sure to click the SAVE button to save your progress until you are done!
Step 4
Once you are finished grading, you MUST CHANGE – Not reviewed to Approved then SAVE again! You are now done.
Important Reminders
Grades are due 48 hours after your final class meeting/final examination.
Timely submission of final grades is critical, as Registrar staff must quickly begin the process of clearing candidates for degree conferral. In addition, we must quickly review the status of probationary students, and determine those who qualify for inclusion on the Dean’s/Honor’s List.
UW – Unauthorized Withdrawal
The grade of UW should be assigned when a student never initiated proper withdrawal procedure and either stopped attending a class or didn’t attend the class at all. This grade should NOT be used as a “kind” alternative to an earned F. In many instances, a UW can affect a student’s financial aid eligibility for the current and future terms and might require the university to return federal financial aid funds, since the credits are not counted in their units taken/completed.INC – Incomplete (General)
Not included in GPA; included in hours attempted. Should be assigned when discussed with a student and it is determined that all required work will not be completed by the end of the term. Students have until the end of the following semester to complete the unfinished work. Faculty must submit a Change of Grade form to the Registrar’s Office upon completion of the work. “I” followed by another grade symbol, (i.e. IA, IB+, IF) indicates that the work has been completed and the symbol after “I” is used in the GPA. When the work is ultimately completed, the “I” plus the grade remain permanently on the transcript. INC grades earned in undergraduate courses will automatically convert to “F” at the conclusion of the semester following the one in which the grade was assigned (i.e. an outstanding INC earned in a fall course will automatically change to an “F” at the conclusion of the following spring term unless the coursework is completed and the grad changed).Incomplete Grades (Undergraduate courses only)
INC grades earned in undergraduate courses will automatically convert to “F” at the conclusion of the semester following the one in which the grade was assigned (i.e. an outstanding INC earned in a spring course will automatically change to an “F” at the conclusion of the following fall term). Please be sure that you’ve had a discussion with the student regarding the INC assignment before assigning it.W – Authorized Withdrawal
Not computed, counted in hours attempted. Indicates a student-initiated withdrawal. This grade is preprinted on the grade roster.AUD – Audit Non-credit.
Not included in GPA. This grade is preprinted on the grade roster.Regular Grading Basis A Excellent 4.000 quality points per credit hour A- 3.667 B+ Very good 3.333 B Good 3.000 B- 2.667 C+ Above Average 2.333 C Average 2.000 C- Below Average 1.667 (available for undergraduate courses only) D Passing 1.000 (available for undergraduate courses only) F Failure 0.000 Pass/Not Pass Grade Basis P Passing Not computed in GPA F Failure 0.000 Error Screens
If you click on any of the new features that are not yet functional, you will get the following:
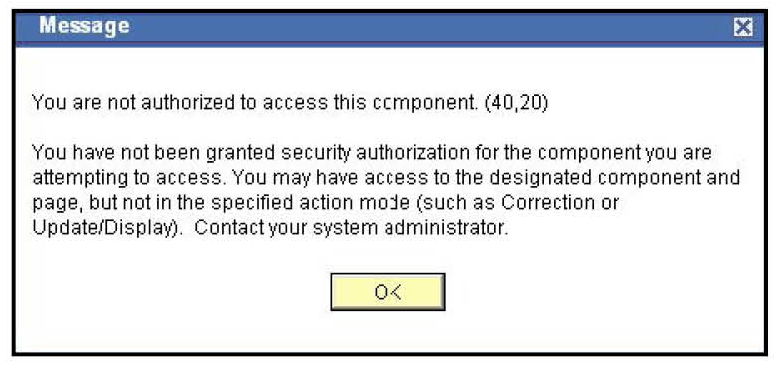 After clicking “OK” the message will disappear and will give you the next: “You are not authorized for this page.”
 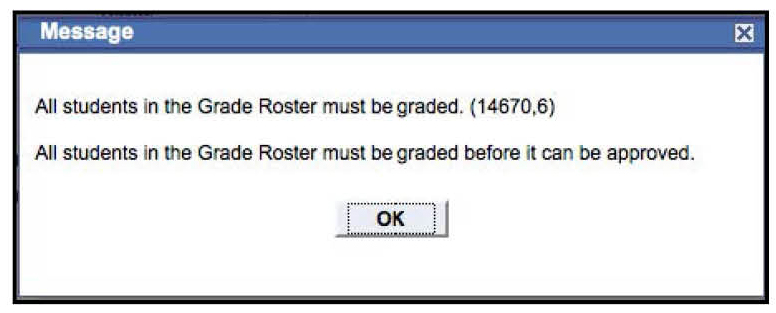 This message will appear if you change your grading status to “Approved” without having all students graded. Click “OK” to go back, then change the status back to “Not Approved.”
In the event you would like to print out your grades once done, please select the browser you are using for the appropriate instructions.
Step 1
Seeing your class roster
To see your class roster follow the instructions below:
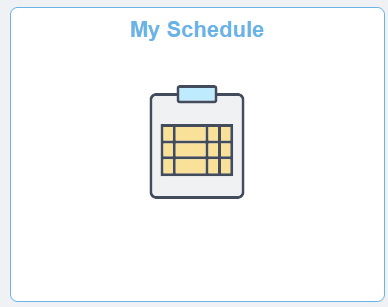
- Log into MYLIU with your LIU credentials
- After logging in click on the large schedule icon
- On the next page, click on the people Icon, not on the hyperlink text.
In the event you would like to print out your grades once done, please select the browser you are using below for the appropriate instructions.
Step 1
Make sure the correct semester is selected. If it is not, click on the Change Term button.

Step 2
Click on the Grade Roster icon for the desired class.
Step 3
At the bottom of the Roster click on the Printer Friendly Version link

Step 4
Right click in the white space closest to the list and select This Frame then Print Frame

Step 1
Make sure the correct semester is selected. If it is not, click on the Change Term button.

Step 2
Click on the Grade Roster icon for the desired class.
Step 3
At the bottom of the Roster click on the Printer Friendly Version link

Step 4
Right click in the white space closest to the list and select Print

Step 1
Make sure the correct semester is selected. If it is not, click on the Change Term button.

Step 2
Click on the Grade Roster icon for the desired class.
Step 3
At the bottom of the Roster click on the Printer Friendly Version link

Step 4
Right click in the white space closest to the list and select Print

Step 1
Make sure the correct semester is selected. If it is not, click on the Change Term button.

Step 2
Click on the Grade Roster icon for the desired class.
Step 3
At the bottom of the Roster click on the Printer Friendly Version link

Step 4
Right click in the white space closest to the list and select Print

Step 1
Make sure the correct semester is selected. If it is not, click on the Change Term button.

Step 2
Click on the Grade Roster icon for the desired class.
Step 3
At the bottom of the Roster click on the Printer Friendly Version link

Step 4
Right click in the white space closest to the list and select Print

For Students
Activate Your Account
Welcome to LIU! Now that your account has been created it’s time to activate it so you can login. Current students who have had their account passwords reset by IT will also need to activate their accounts after the reset.
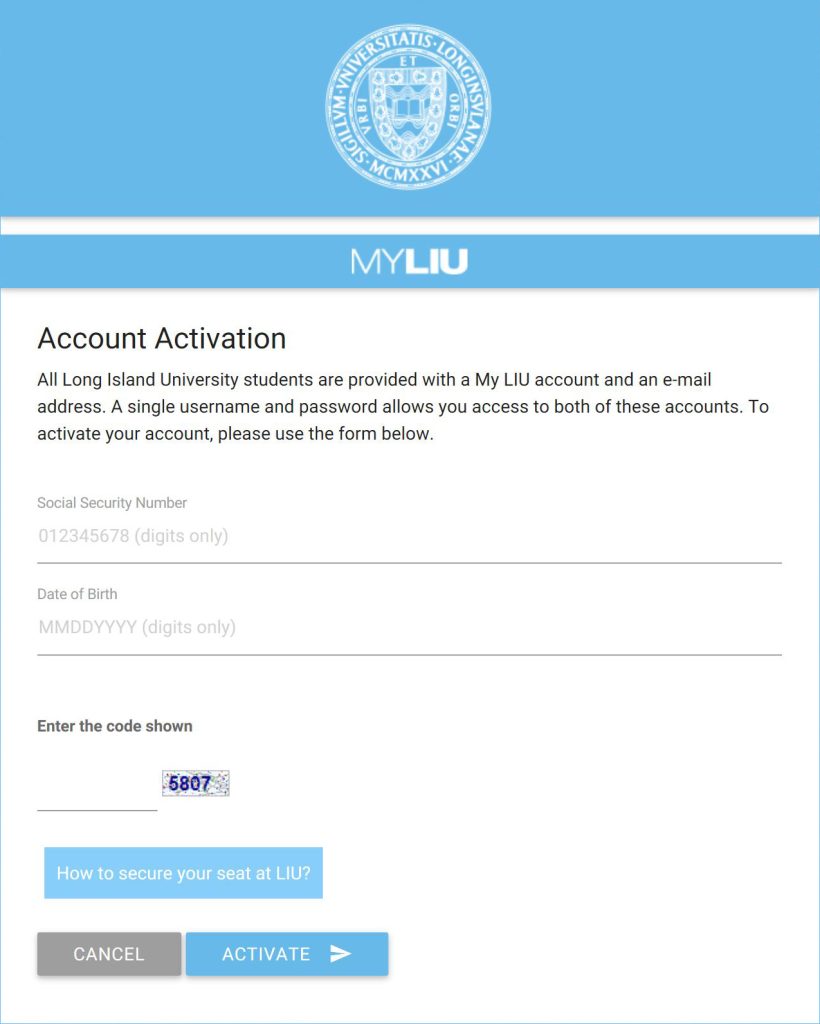
Step 1
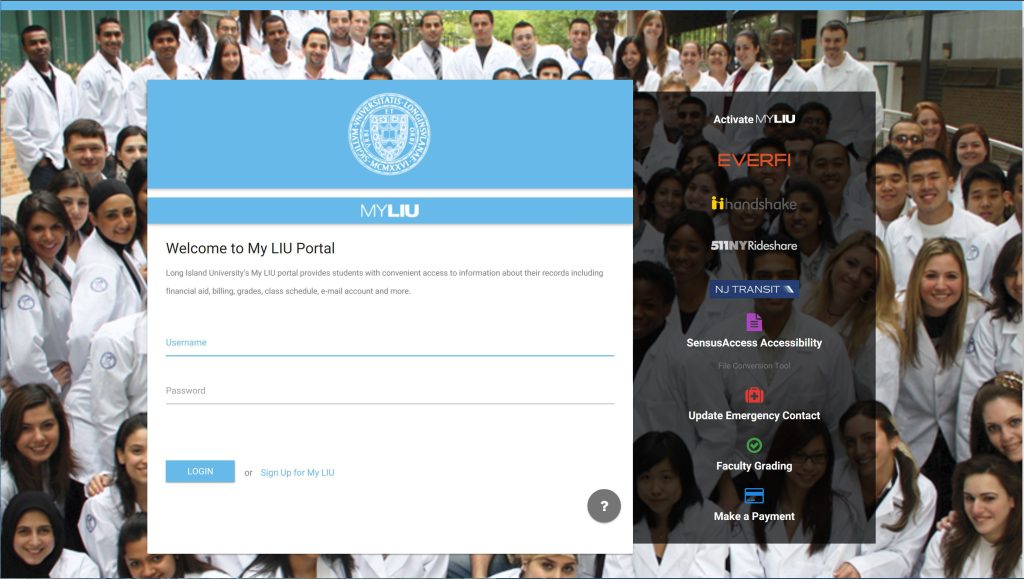
In a browser, navigate to my.liu.edu and click on the Activate MYLIU link on the top of the list to the right
Step 2Enter the requested information in each field, then click Activate.
Note 1: If you are having issues with your social security number, or don’t have one, you can use your student ID number.
Note 2: If you still cannot get past this step, contact the registrar to make sure all of your information (name, social, DOB) is correct.
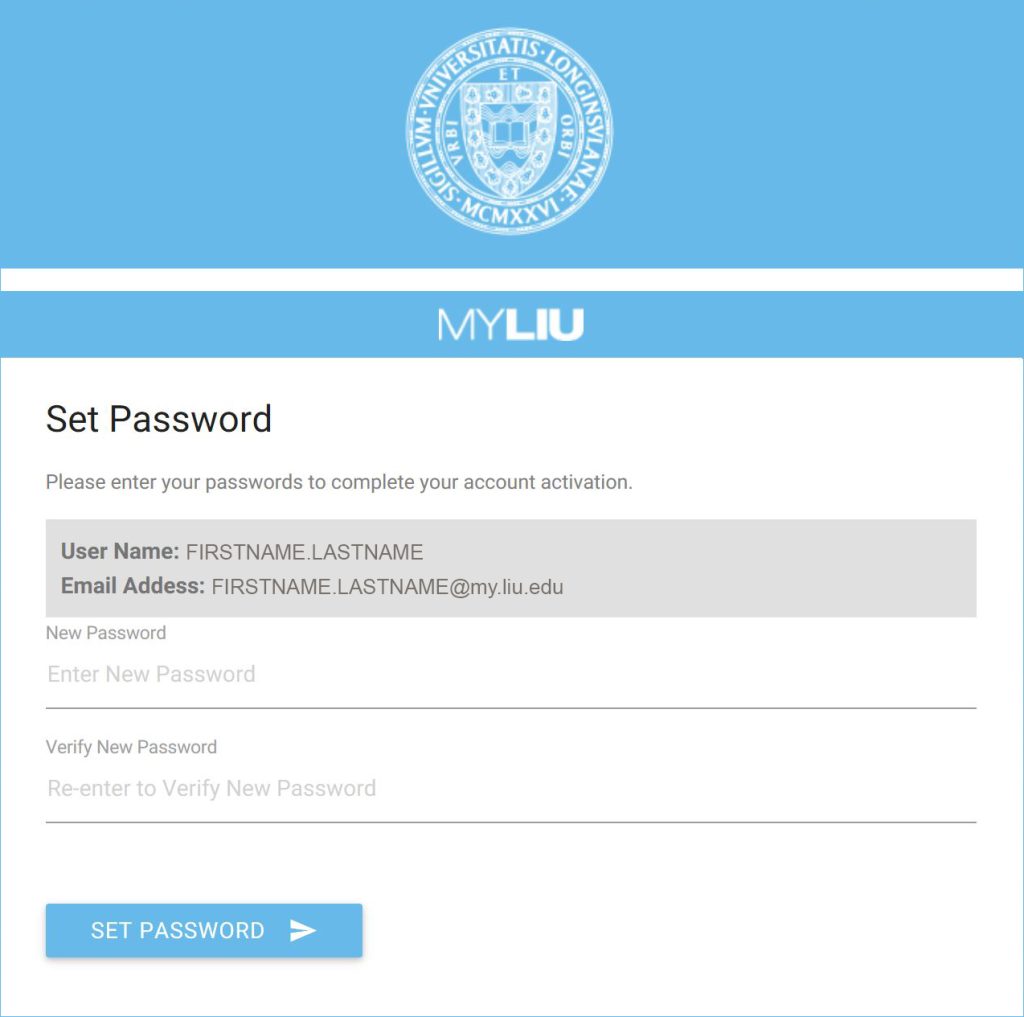
Step 3
Enter the password you would like to use.
- 10 Characters
- 1 Capital (minimum)
- 1 Number (minimum)
- 1 Special Character (minimum) – example ! # % * . ?
- Cannot be a previous password
- Cannot have more than 3 sequential numbers
- Cannot contain all the same letter or number
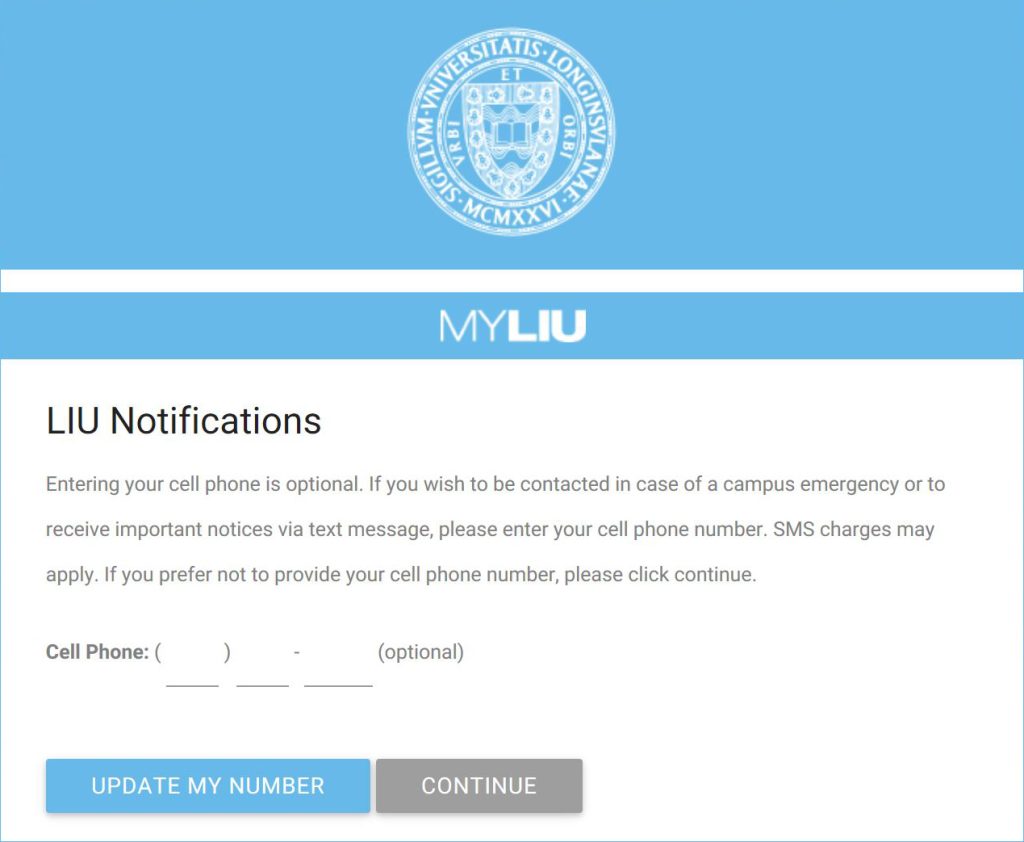
Step 4 (not required)
Enter your mobile number if you would like to get campus announcements by text. This step is not mandatory but you must click the button to continue.
Step 5
You will be taken back to the login page and you can now log in.

MyLIU email (Gmail)
See how to connect your LIU email (gmail) to your mobile devices. Click here.
My LIU Apps provides a gateway to Google’s online services, allowing you to take advantage of Google’s email, productivity, and collaboration tools while maintaining your LIU email name. In addition to email you can also save your documents online, chat with friends, and more. You will also have plenty of room, over 7GB of server space and counting!
What services are offered?
Gmail: Google Email
Enjoy Google’s powerful email program without the ads.
With over 7GB of space that’s constantly growing, you can forget about quotas.Calendar – Events Made Easy
Organize your life with a simple online calendar.
Keep a calendar for yourself, share another with your friends.Talk – An Easy Way to Chat
Chat with your friends and classmates on the web or on your desktop.
Organize a group chat to go over homework or make a voice call.Documents – Made for Collaboration
Easily create documents, spreadsheets, or presentations and export them to your favorite desktop program.
Share them with your group and make changes together in real time.iGoogle Start Page
Have one easy place to check for recent email, upcoming calendar events, the weather, movie times, and more.Google Sync – Stay in Touch
Synchronize your Google Calendar and Contacts to mobile devices that support Microsoft Exchange ActiveSync, such as iPhone, Windows Mobile and other devices.Downloadable PDF’s:
Email
• Web Mail
• MyLIU Configuration Android
• MyLIU Configuration iOS
• MyLIU Configuration WindowsCalendar
• Help DocumentPrivacy Statement
Long Island University is committed to ensuring the confidentiality of personally identifiable information provided by its employees, students, and visitors. However, some personally identifiable information may be subject to disclosure pursuant to Federal and/or state law. In these cases, the University may disclose information to third parties when such disclosure is required or permitted by law.Governing Law
In general, the Family Education Rights and Privacy Act (“FERPA”) (20 USC §1232(g)) prohibits the release of students’ educational records. However, the University may release student directory information or student educational records if allowed or required by FERPA.
Your access and use of the University’s websites, and these terms and conditions, are governed by, and will be construed in accordance with, the laws of the State of New York. In the event that any provision of these terms and conditions is held unenforceable, it will not affect the validity or enforceability of the remaining terms and conditions.Information Collected
It is the policy and practice of Long Island University to collect the least amount of personally identifiable information necessary to fulfill its required duties and responsibilities, complete a particular transaction, deliver services, or as required by law. This applies to the collection of all personally identifiable information regardless of source or medium. Information provided should only be shared with members of the University community who have a need to know in order to provide services or conduct University business. The University may share personally identifiable information with other individuals or organizations that provide services to the University. The University requires these third parties to protect personally identifiable information it receives pursuant to this policy and applicable law. The University will take reasonable and appropriate measures to protect personally identifiable information from unauthorized access or disclosure.Individuals may choose not to provide information to the University via the Internet. Most University websites may be accessed without providing personally identifiable information, however some options or special services may require the submission of personally identifiable information.
No data transmitted over the Internet can be guaranteed to be 100% secure. While the University strives to protect your personal information, we cannot ensure or warrant the security of any information you transmit to us and you do so at your own risk. Once we receive your personal information, we make every effort to ensure its security.
Information other than personally identifiable information may be collected from the Internet for analysis and statistical purposes. Such information may include user visit logs, network traffic logs, and small text files known as “cookies” used to assess website activity. Information collected from the Internet is used to diagnose problems, assess what information is of most interest, determine technical design specifications, and identify system performance and/or problem areas.
Please send questions or concerns to privacy@liu.edu.
